
调试OpenJDK
调试Windos的JDK
环境准备
系统是 Windows11,使用 CLion 2021.2.1 版本。
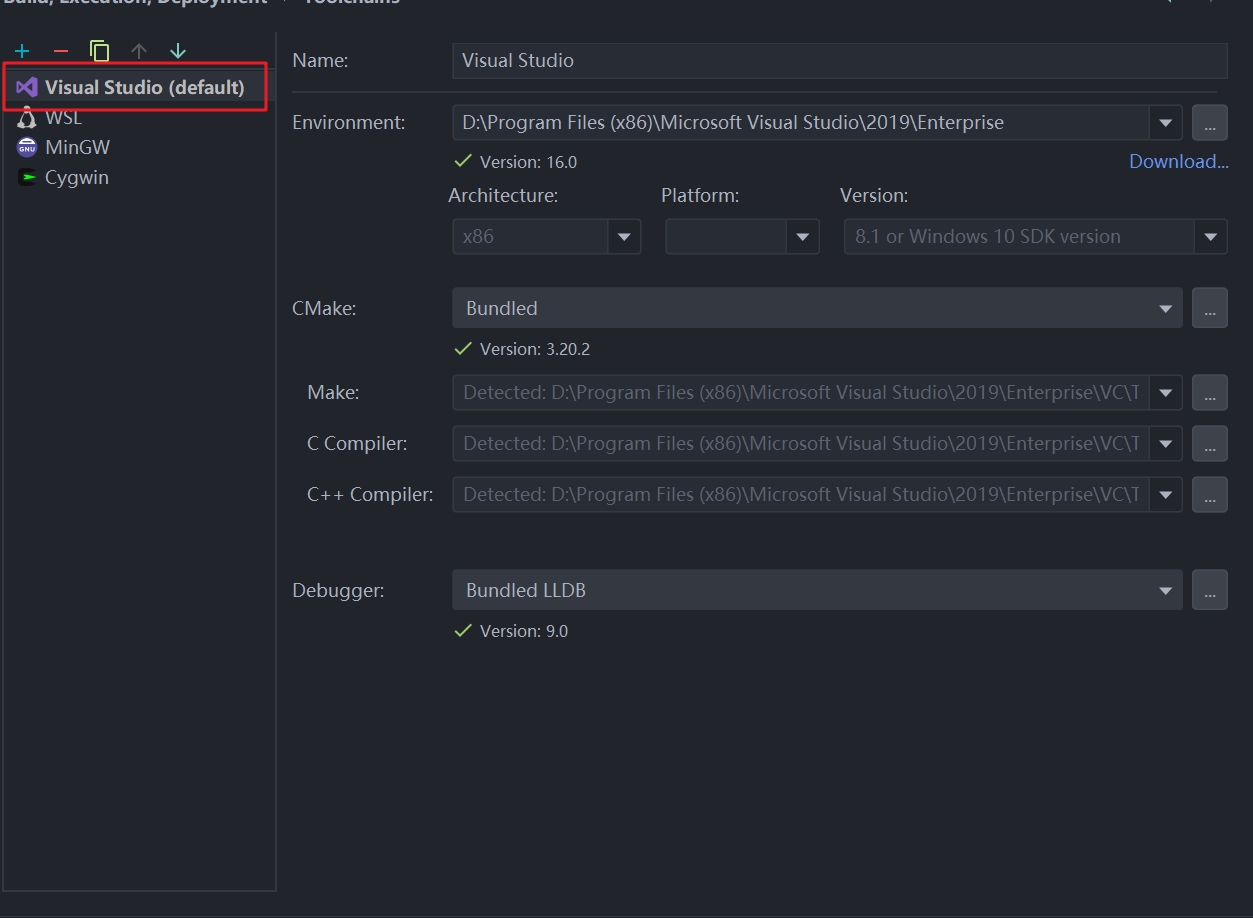
首先添加VS工具链,并设置为默认。
生成compilation databases文件。
# 配置
bash configure --with-freetype-include="/cygdrive/d/Tools/freetype/include" --with-freetype-lib="/cygdrive/d/Tools/freetype/" --with-boot-jdk="/cygdrive/d/SDK/JDK/jdk-16.0.2+7" --with-tools-dir="/cygdrive/d/Program Files (x86)/Microsoft Visual Studio/2019/Enterprise/VC/Auxiliary/Build" --disable-warnings-as-errors --with-jtreg="/cygdrive/d/Tools/jtreg" --with-version-opt="DevLGQ-17.0.0.35" --with-vendor-version-string="DevLGQ" --with-debug-level=fastdebug

# 生成 compilation databases
make CONF=windows-x86_64-server-fastdebug compile-commands

# 使用 FixCompileCommands 修正 compilation databases 问题
java .\FixCompileCommands.java H:\Tmp\compile_commands.json
在FixCompileCommands下载修正程序.
如果不想跳转去下载的, 可以直接复制下面的去用. FixCompileCommands.java文件.
import java.io.File;
import java.io.IOException;
import java.nio.file.Files;
import java.nio.file.Path;
import java.nio.file.StandardCopyOption;
import java.nio.file.StandardOpenOption;
import java.util.ArrayList;

public class FixCompileCommands {
    public static void main(String[] args) throws IOException {
        if (args.length < 1) {
            System.err.println("Pass absolute path to compile_commands.json file as argument");
            System.exit(1);
        }
        final File file = new File(args[0]);
        final Path filePath = file.toPath();
        final File backupFile = new File(file.getParentFile(), file.getName() + ".old");
        Files.copy(filePath, backupFile.toPath(), StandardCopyOption.REPLACE_EXISTING);
        final String data = Files.readString(filePath);
        final String fixed = fixCompDBJsonText(data);
        Files.writeString(filePath, fixed, StandardOpenOption.WRITE);
    }

    private static String fixCompDBJsonText(String data) throws IOException {
        final String[] lines = data.split("\\r?\\n");
        if (lines.length == 1) throw new IllegalArgumentException("Multiline json file expected");
        final ArrayList<String> fixedLines = new ArrayList<>();
        for (String line : lines) {
            fixedLines.add(processLine(line));
        }
        return String.join(NEW_LINE, fixedLines);
    }

    private static String processLine(String line) throws IOException {
        final String ENTRY_LINE_PREFIX = "{ \"directory\":";
        if (!line.startsWith(ENTRY_LINE_PREFIX)) return line;
        final String FILE_PREFIX = "\"file\": \"";
        final String COMMAND_PREFIX = "\", \"command\": \"";
        final String ENTRY_LINE_SUFFIX = "\" }";
        final String prefix = substringBefore(line, FILE_PREFIX) + FILE_PREFIX;
        final String filePath = substringBefore(substringAfter(line, FILE_PREFIX), COMMAND_PREFIX);
        final String fixedFilePath = new File(filePath).getCanonicalPath();
        final String commandStr = substringBefore(substringAfter(line, COMMAND_PREFIX), ENTRY_LINE_SUFFIX);
        final String fixedCommand = fixFullCommandString(commandStr);
        final String escaped = fixedCommand.replace("\\", "\\\\").replace("\"", "\\\"");
        //fix 'file:' and compiler target paths to speedup clion import (this allow to use internal cache)
        return prefix + fixedFilePath.replace("\\", "\\\\") + COMMAND_PREFIX + escaped + ENTRY_LINE_SUFFIX + ",";
    }


    private static String fixFullCommandString(String commandString) throws IOException {
        final String[] parts = commandString.split(" ");
        ArrayList<String> fixedParts = new ArrayList<>();
        for (int i = 0; i < parts.length; i++) {
            fixedParts.add(fixPart(parts[i], i == 0));
        }
        return String.join(" ", fixedParts);
    }

    /**
     * cygpath -awl <path>
     */
    private static String fixPart(String part, boolean first) throws IOException {
        final String PATH_START = "c:/";
        if (!part.contains(PATH_START)) return part;
        String prefix = substringBefore(part, PATH_START);
        final String path = part.substring(prefix.length());
        String fixedPath = new File(path).getCanonicalPath();
        if (first) {
            // path to compiler
            if (!fixedPath.endsWith(".exe")) {
                fixedPath += ".exe";
            }
        }
        final String GCC_FO_PREFIX = "-Fo";
        final String MSVC_FO_PREFIX = "/Fo";
        //speedup clion import (this allow to use internal cache)
        if (prefix.startsWith(GCC_FO_PREFIX)) {
            prefix = MSVC_FO_PREFIX + prefix.substring(GCC_FO_PREFIX.length());
        }
        return prefix + "\"" + fixedPath + "\"";
    }

    private static String substringAfter(String string, String delimiter) {
        int index = string.indexOf(delimiter);
        if (index == -1) return string;
        return string.substring(index + delimiter.length());
    }

    private static String substringBefore(String string, String delimiter) {
        int index = string.indexOf(delimiter);
        if (index == -1) return string;
        return string.substring(0, index);
    }

    private static String NEW_LINE = System.getProperty("line.separator");
}
开始调试
使用 CLion 打开转换后的compile_commands.json文件。然后修改项目根目录,把根目录指向openjdk项目的根目录。

修改后

添加编译和清理指令


添加编译target

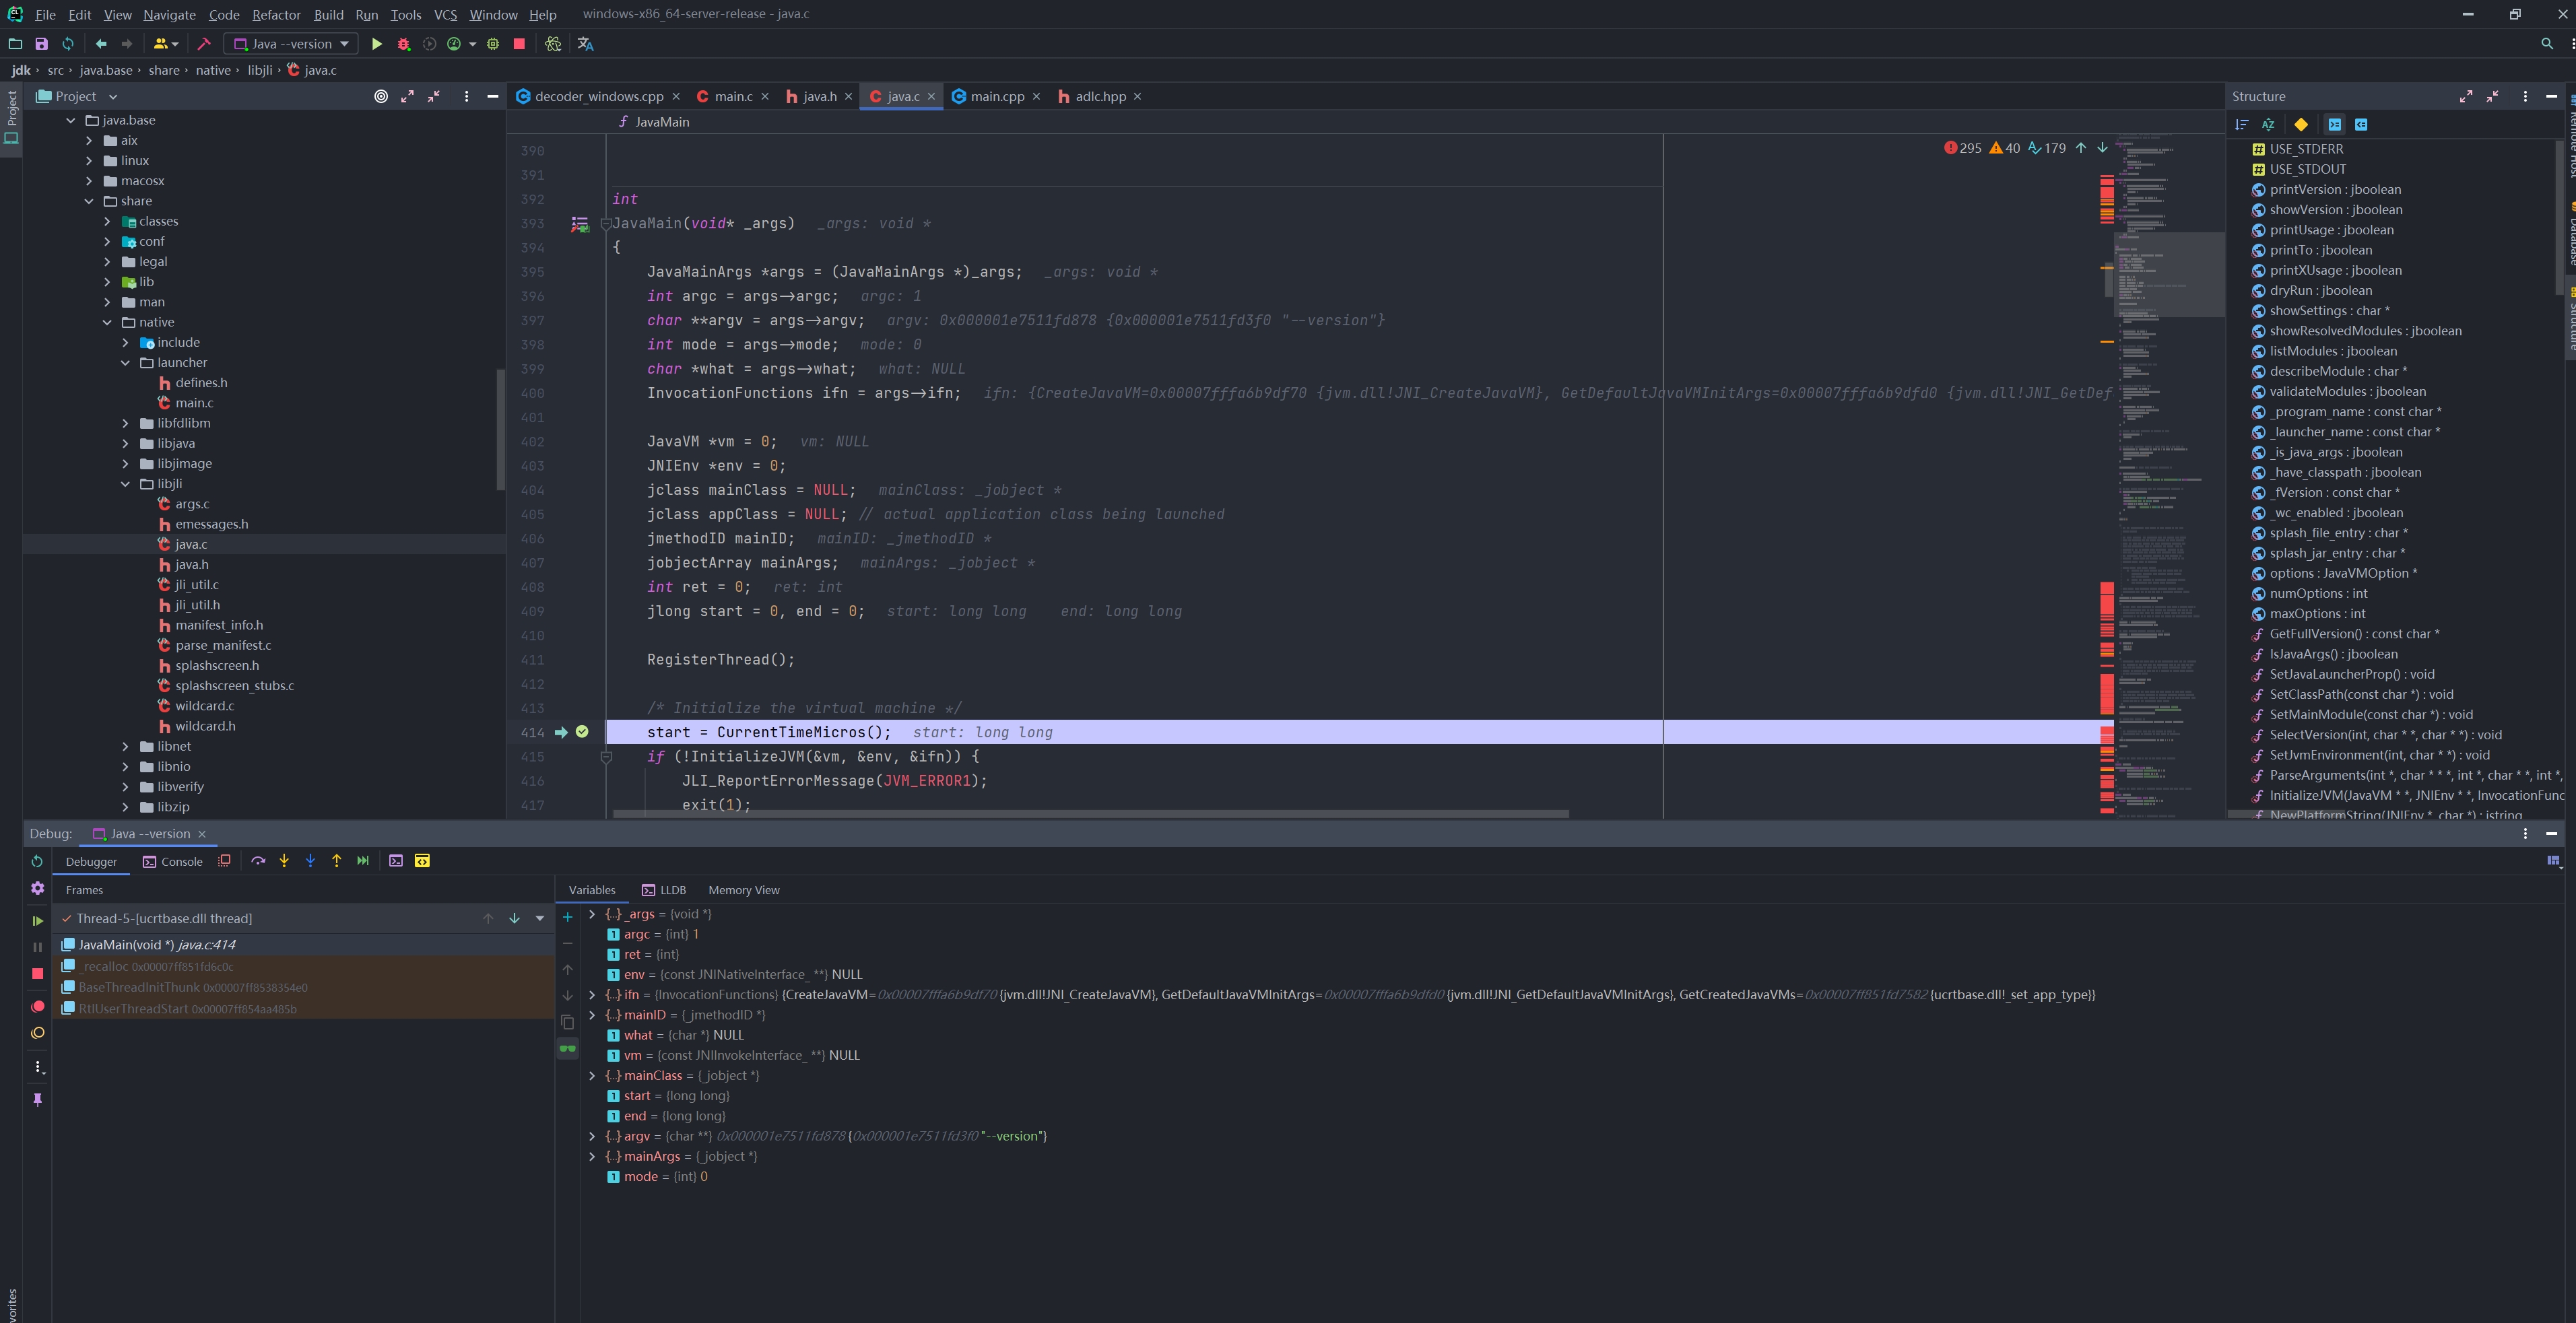
运行和调试配置,先使用-version简单的指令来测试看看是否能够调试。

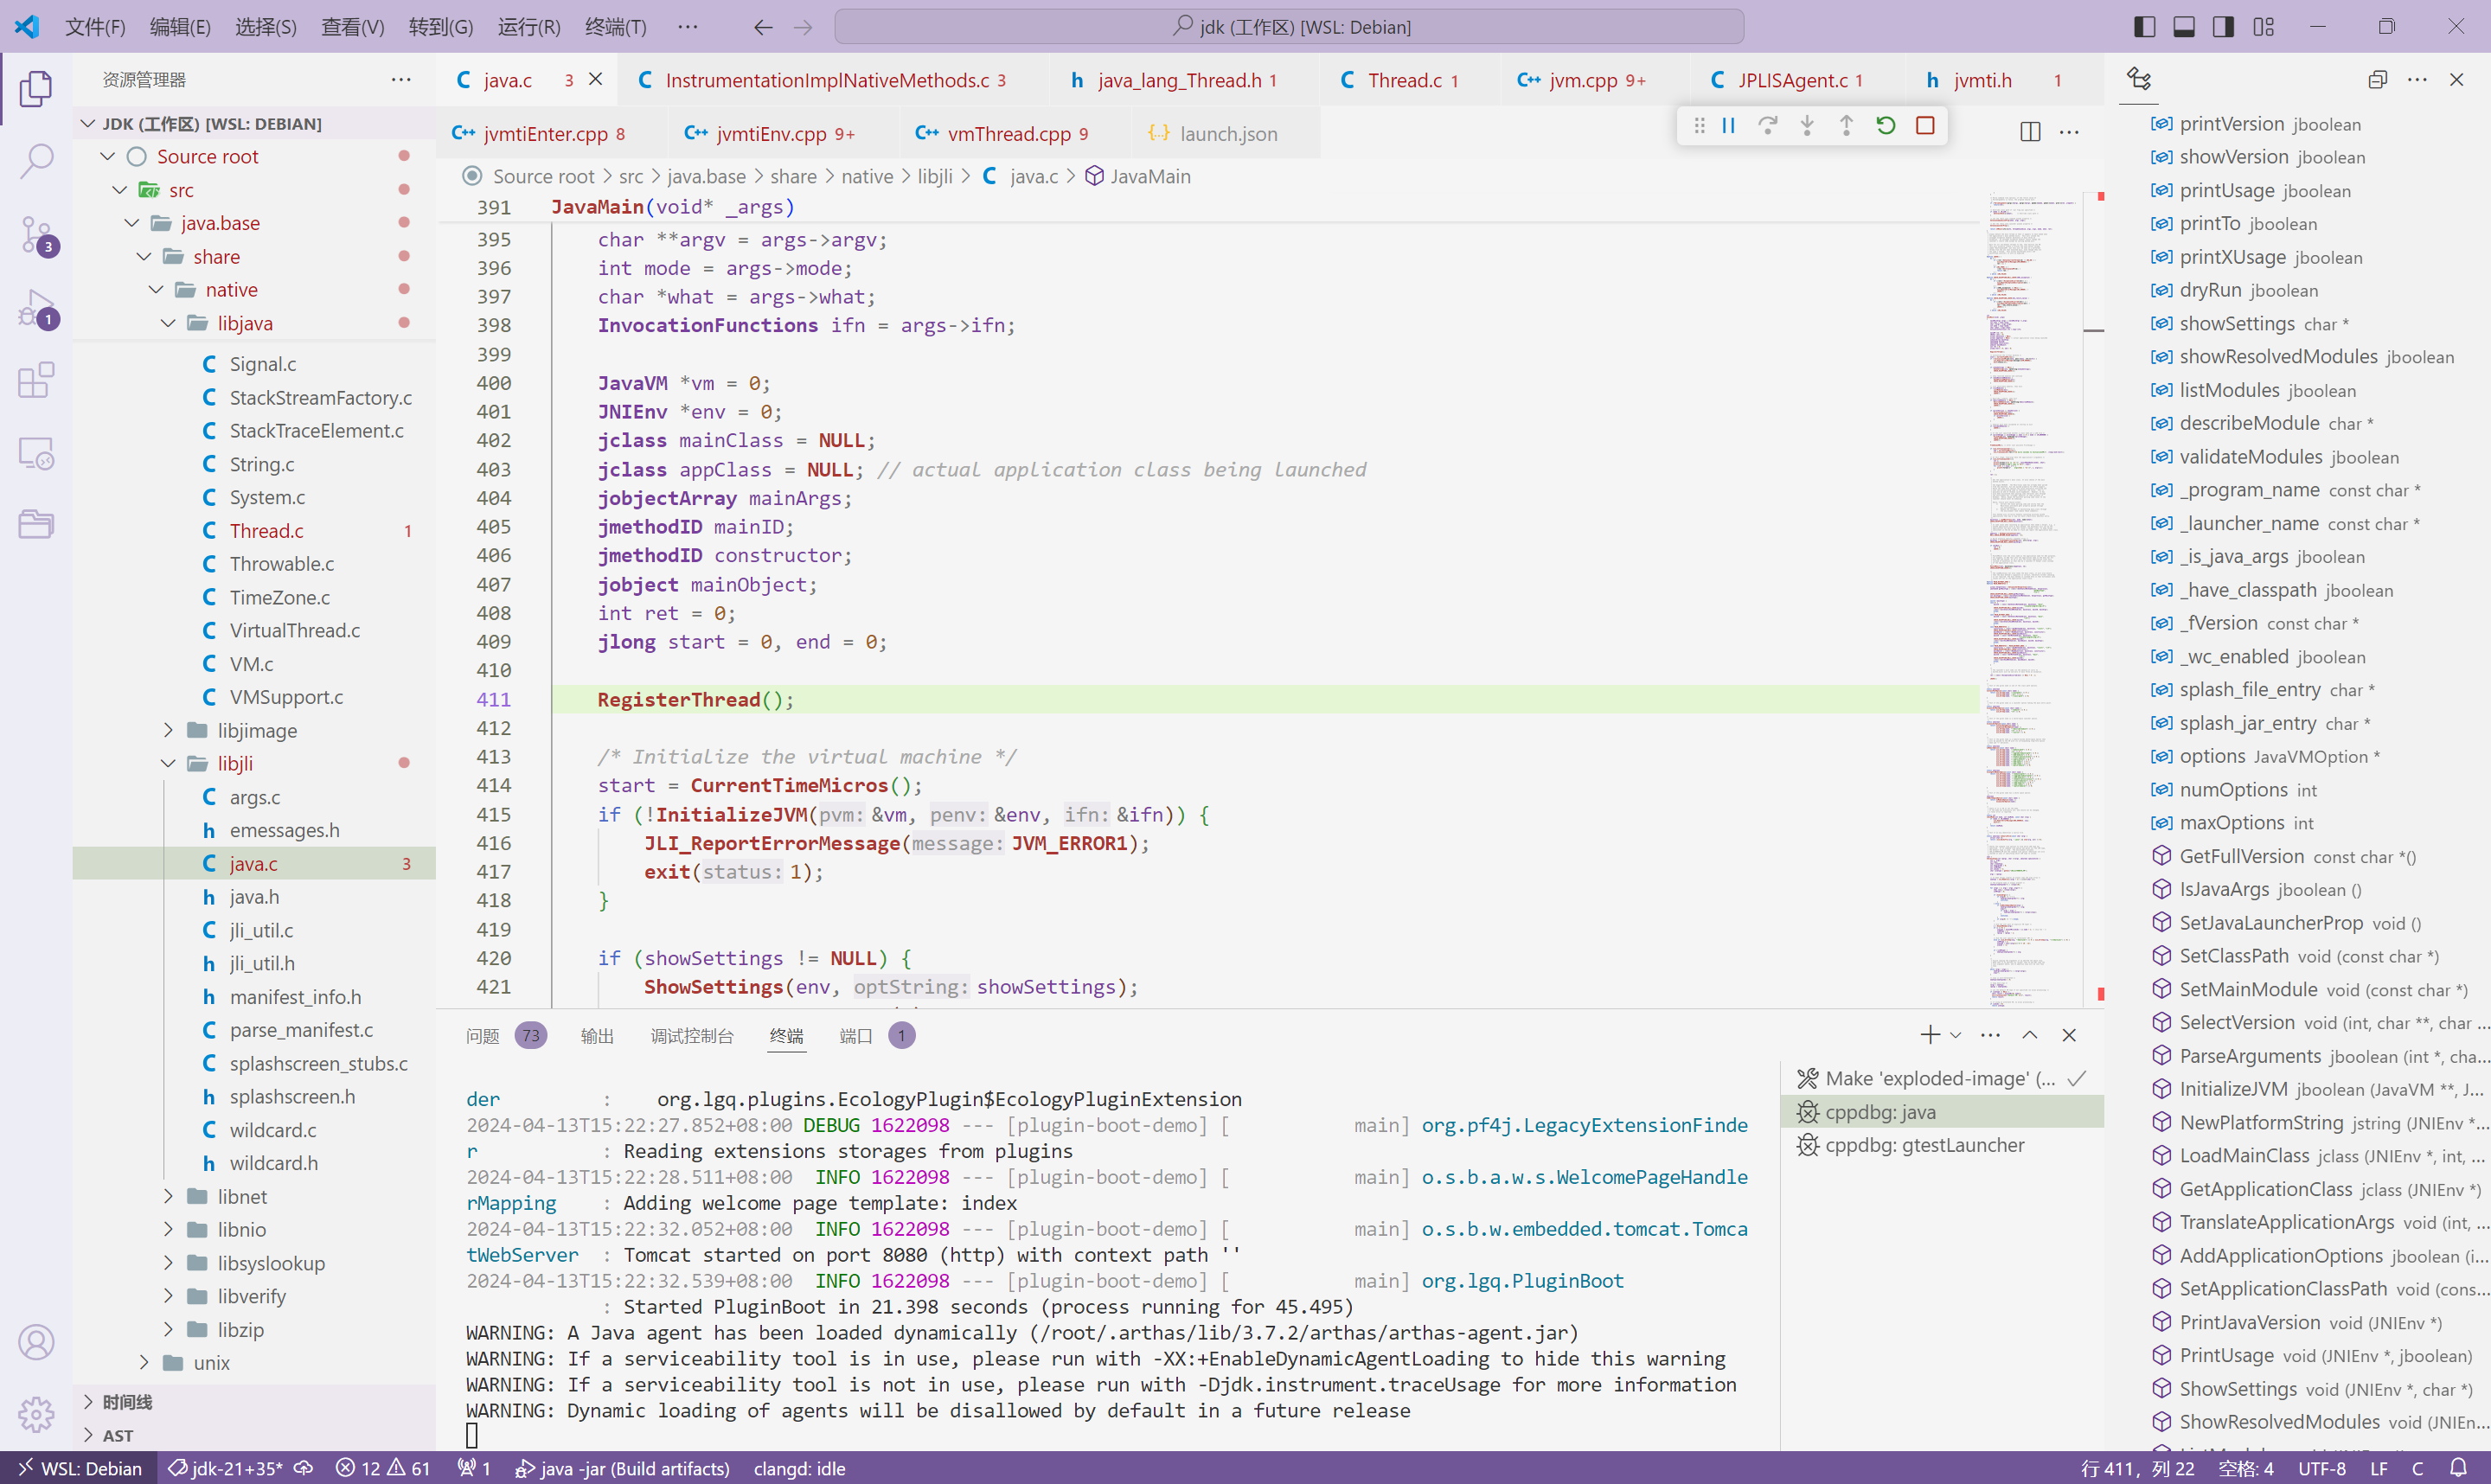
开始调试。打开java.c文件,找到JavaMain方法,然后打个断点,点击调试按钮。

可以看到调试没有问题。之后有空再做一些深入的调试和分析。
调试Linux的JDK
使用的Clion版本为:2023.3
WSL编译链版本如下

生成compilation database文件。
# 配置
./configure --enable-debug --with-jvm-variants=server --build=x86_64-unknown-linux-gnu --with-version-opt="DevLGQ-21.0.0+31" --with-vendor-version-string="DevLGQ"
# 编译images,JOBS使用6核,根据需求进行修改
make JOBS=6 images CONF=linux-x86_64-server-fastdebug
# 生成compile_commands.json
make compile-commands CONF=linux-x86_64-server-fastdebug
和在Windos下JDK方式一样,不同的是不需要转换compilation database文件,直接打开即可,然后切换为JDK根路径。
保存这个项目打开使用WSL的编译工具链。

自定义编译目标
编译

\\wsl.localhost\Debian\usr\bin\make
CONF=linux-x86_64-server-fastdebug
\root\workspace\jdk
清理

\\wsl.localhost\Debian\usr\bin\make
clean
\root\workspace\jdk
完整配置

添加debug配置
添加一个Custom Build Application。

Excutable指定为编译成功后的java程序,参数的话这里执行了一个jar,并且开启远程调试,这里主要是想调试arthas。
-Xdebug -Xrunjdwp:transport=dt_socket,server=y,address=8000 -jar ./plugin-boot-0.0.1-SNAPSHOT.jar
在需要的地方打个断点,执行arthas指令,就可以进入源码进行debug了。

使用VSC调试JDK
官方是支持使用VSC进行debug的,通过以下指令生成VSC的工作空间文件。
make vscode-project
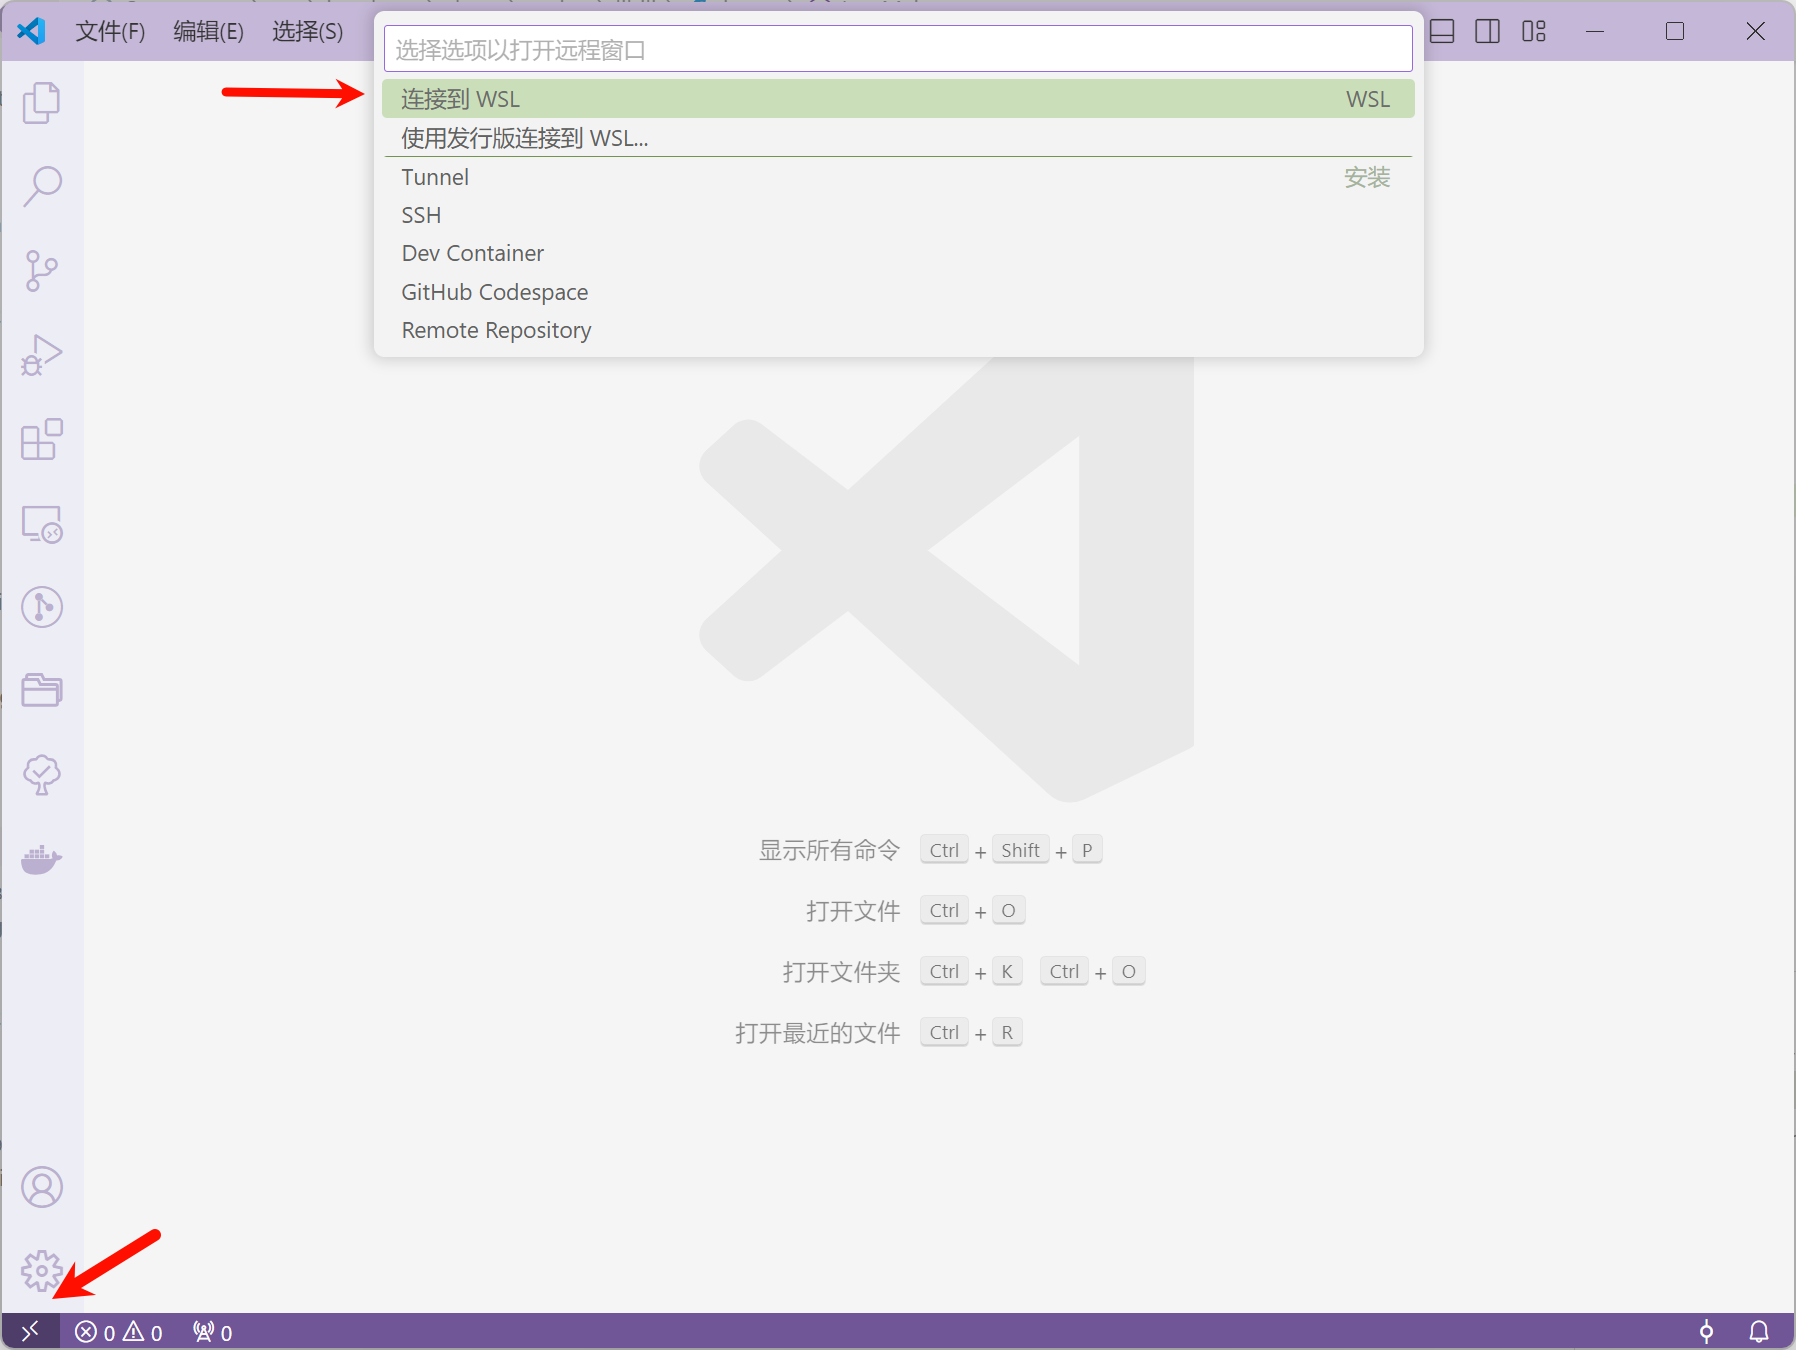
VSC安装WSL插件,然后连接上WSL。
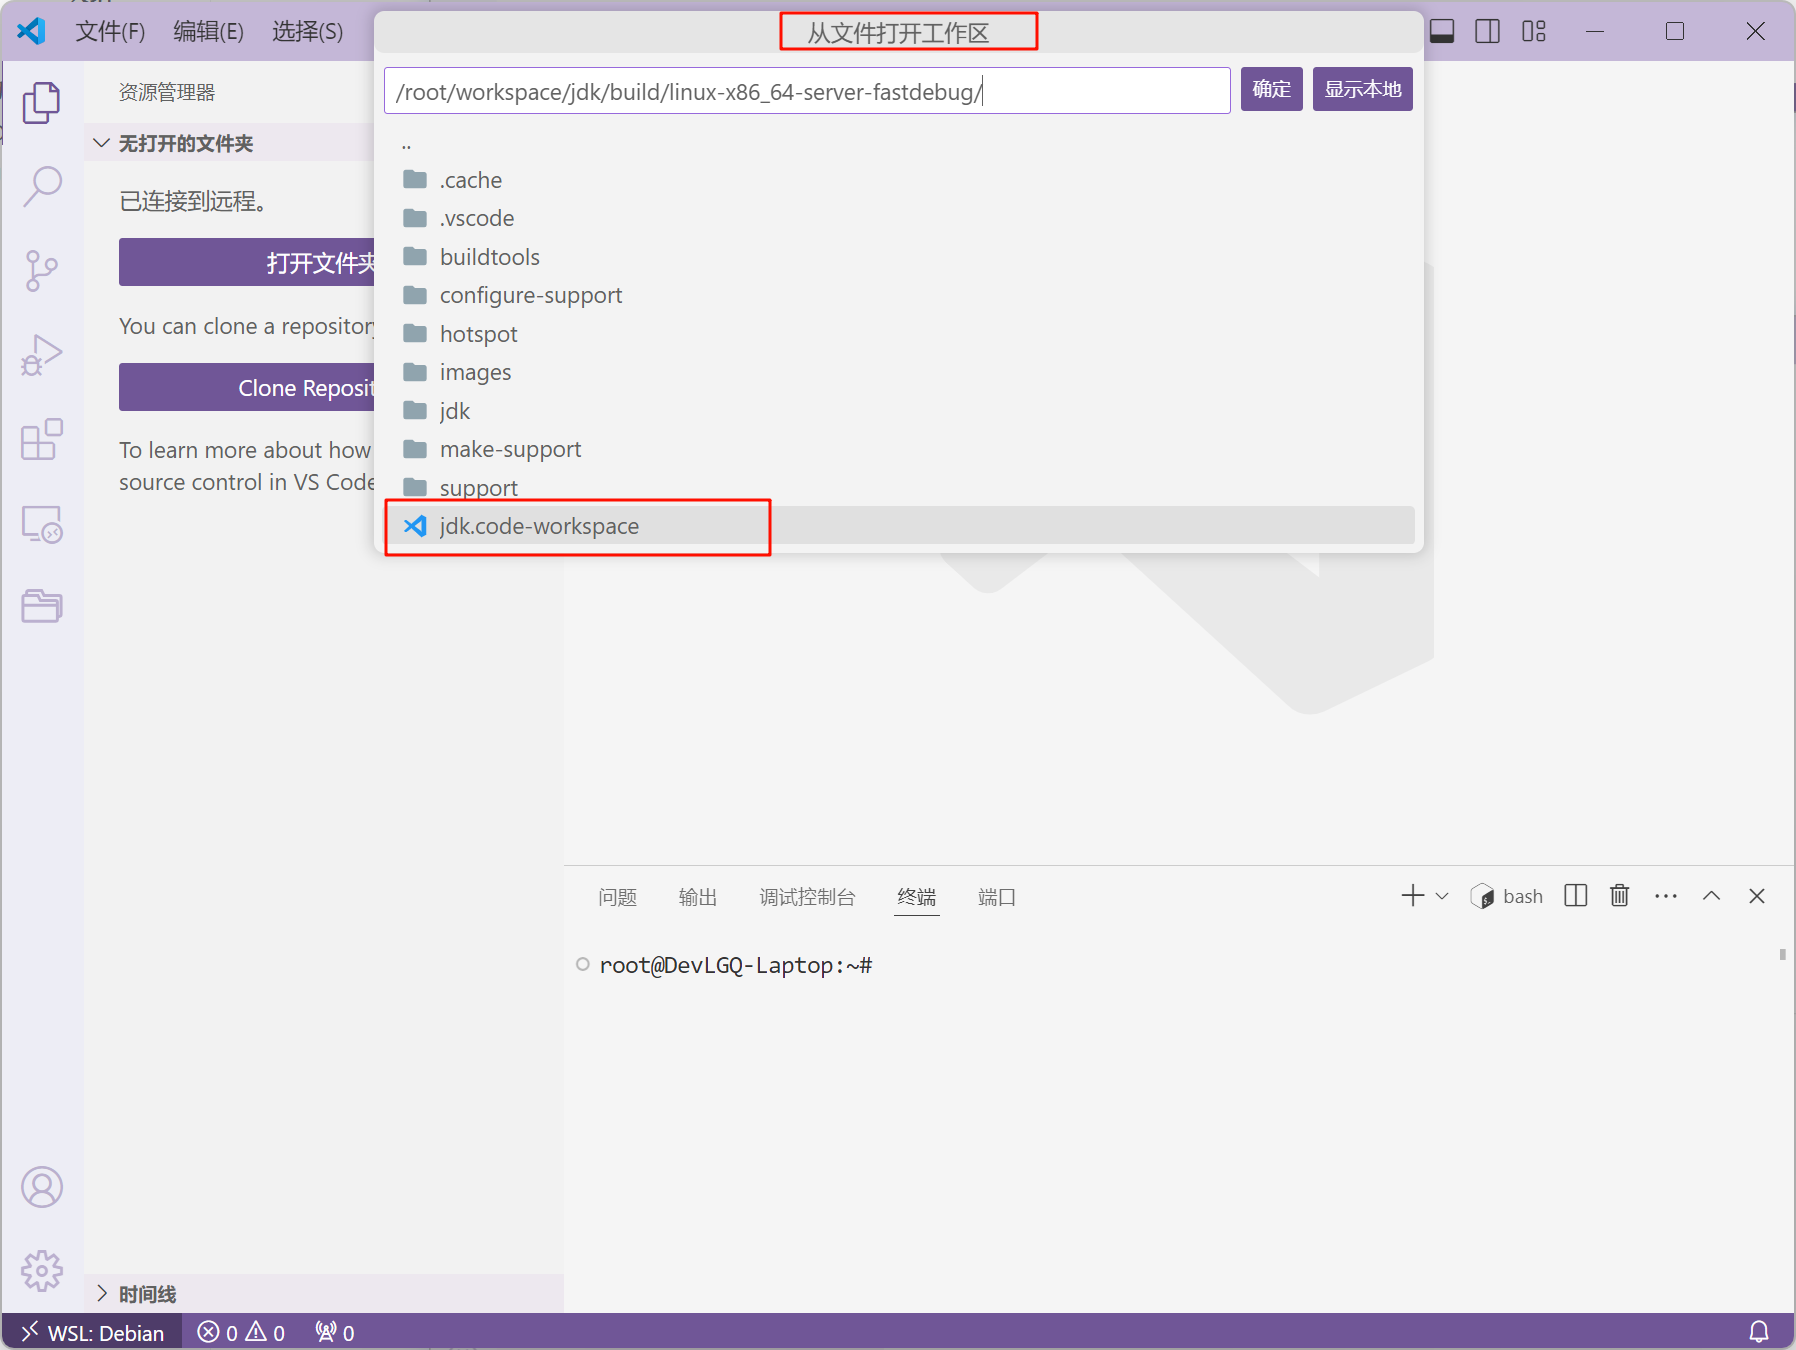
连接后文件 -> 从文件中打开工作区,选择刚刚上面通过make vscode-project生成的工作区文件。
打开后会建议安装一些插件,建议安装,可以提升debug体验。
编辑运行的配置文件
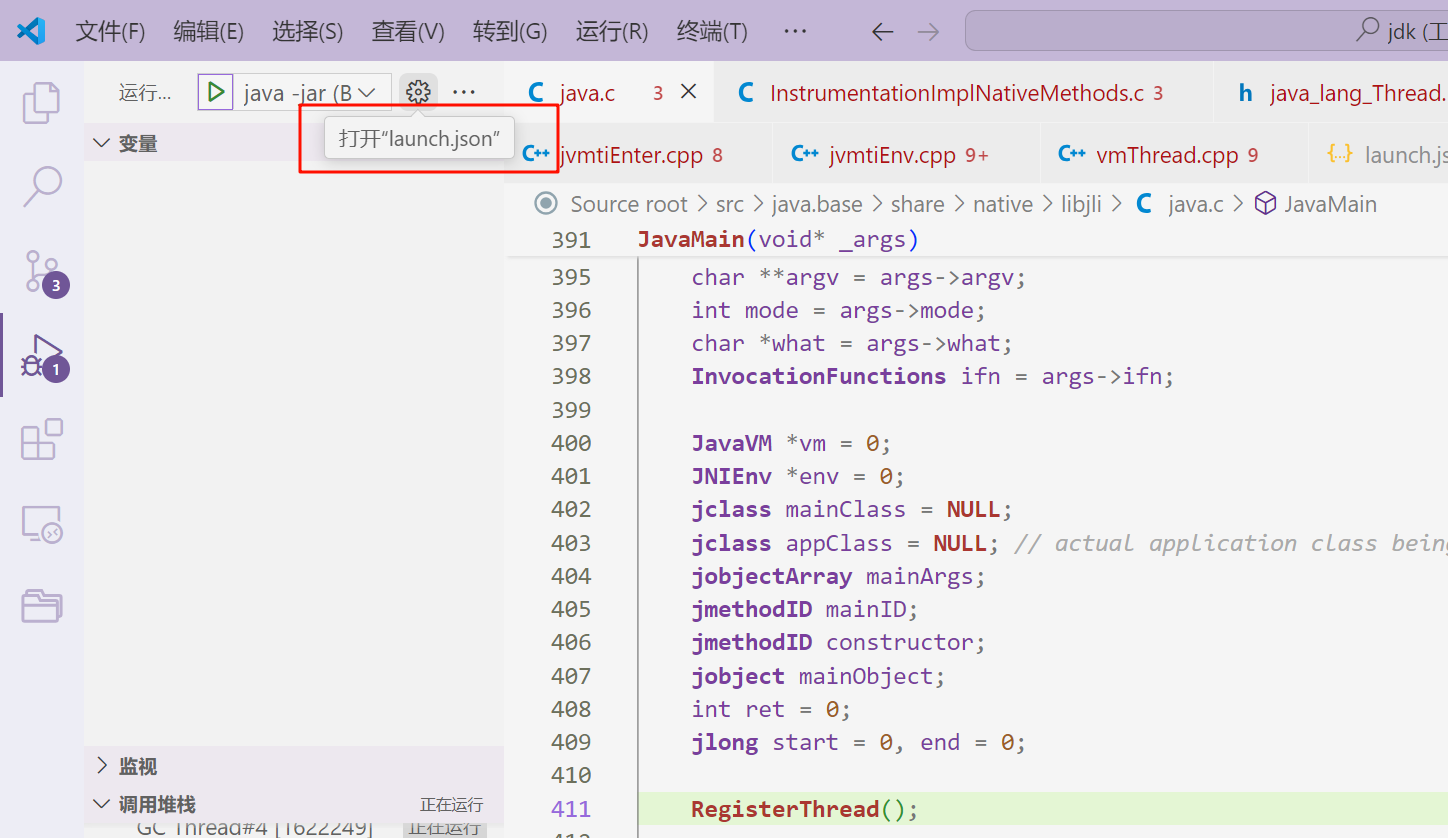
添加个新的debug配置,如下
{
    "name": "java -version",
    "type": "cppdbg",
    "request": "launch",
    "program": "/root/workspace/jdk/build/linux-x86_64-server-fastdebug/jdk/bin/java",
    "stopAtEntry": false,
    "args": ["-version"],
    "cwd": "/root/workspace/jdk",
    "environment": [],
    "externalConsole": false,
    "preLaunchTask": "Make 'exploded-image'",
    "osx": {
        "MIMode": "lldb",
        "internalConsoleOptions": "openOnSessionStart",
    },
    "linux": {
        "MIMode": "gdb",
        "setupCommands": [
            {
                "text": "handle SIGSEGV noprint nostop",
                "description": "Disable stopping on signals handled by the JVM"
            }
        ]
    }
}
在java.c的JavaMain方法打个断点,然后F5启动调试,进入断点成功。
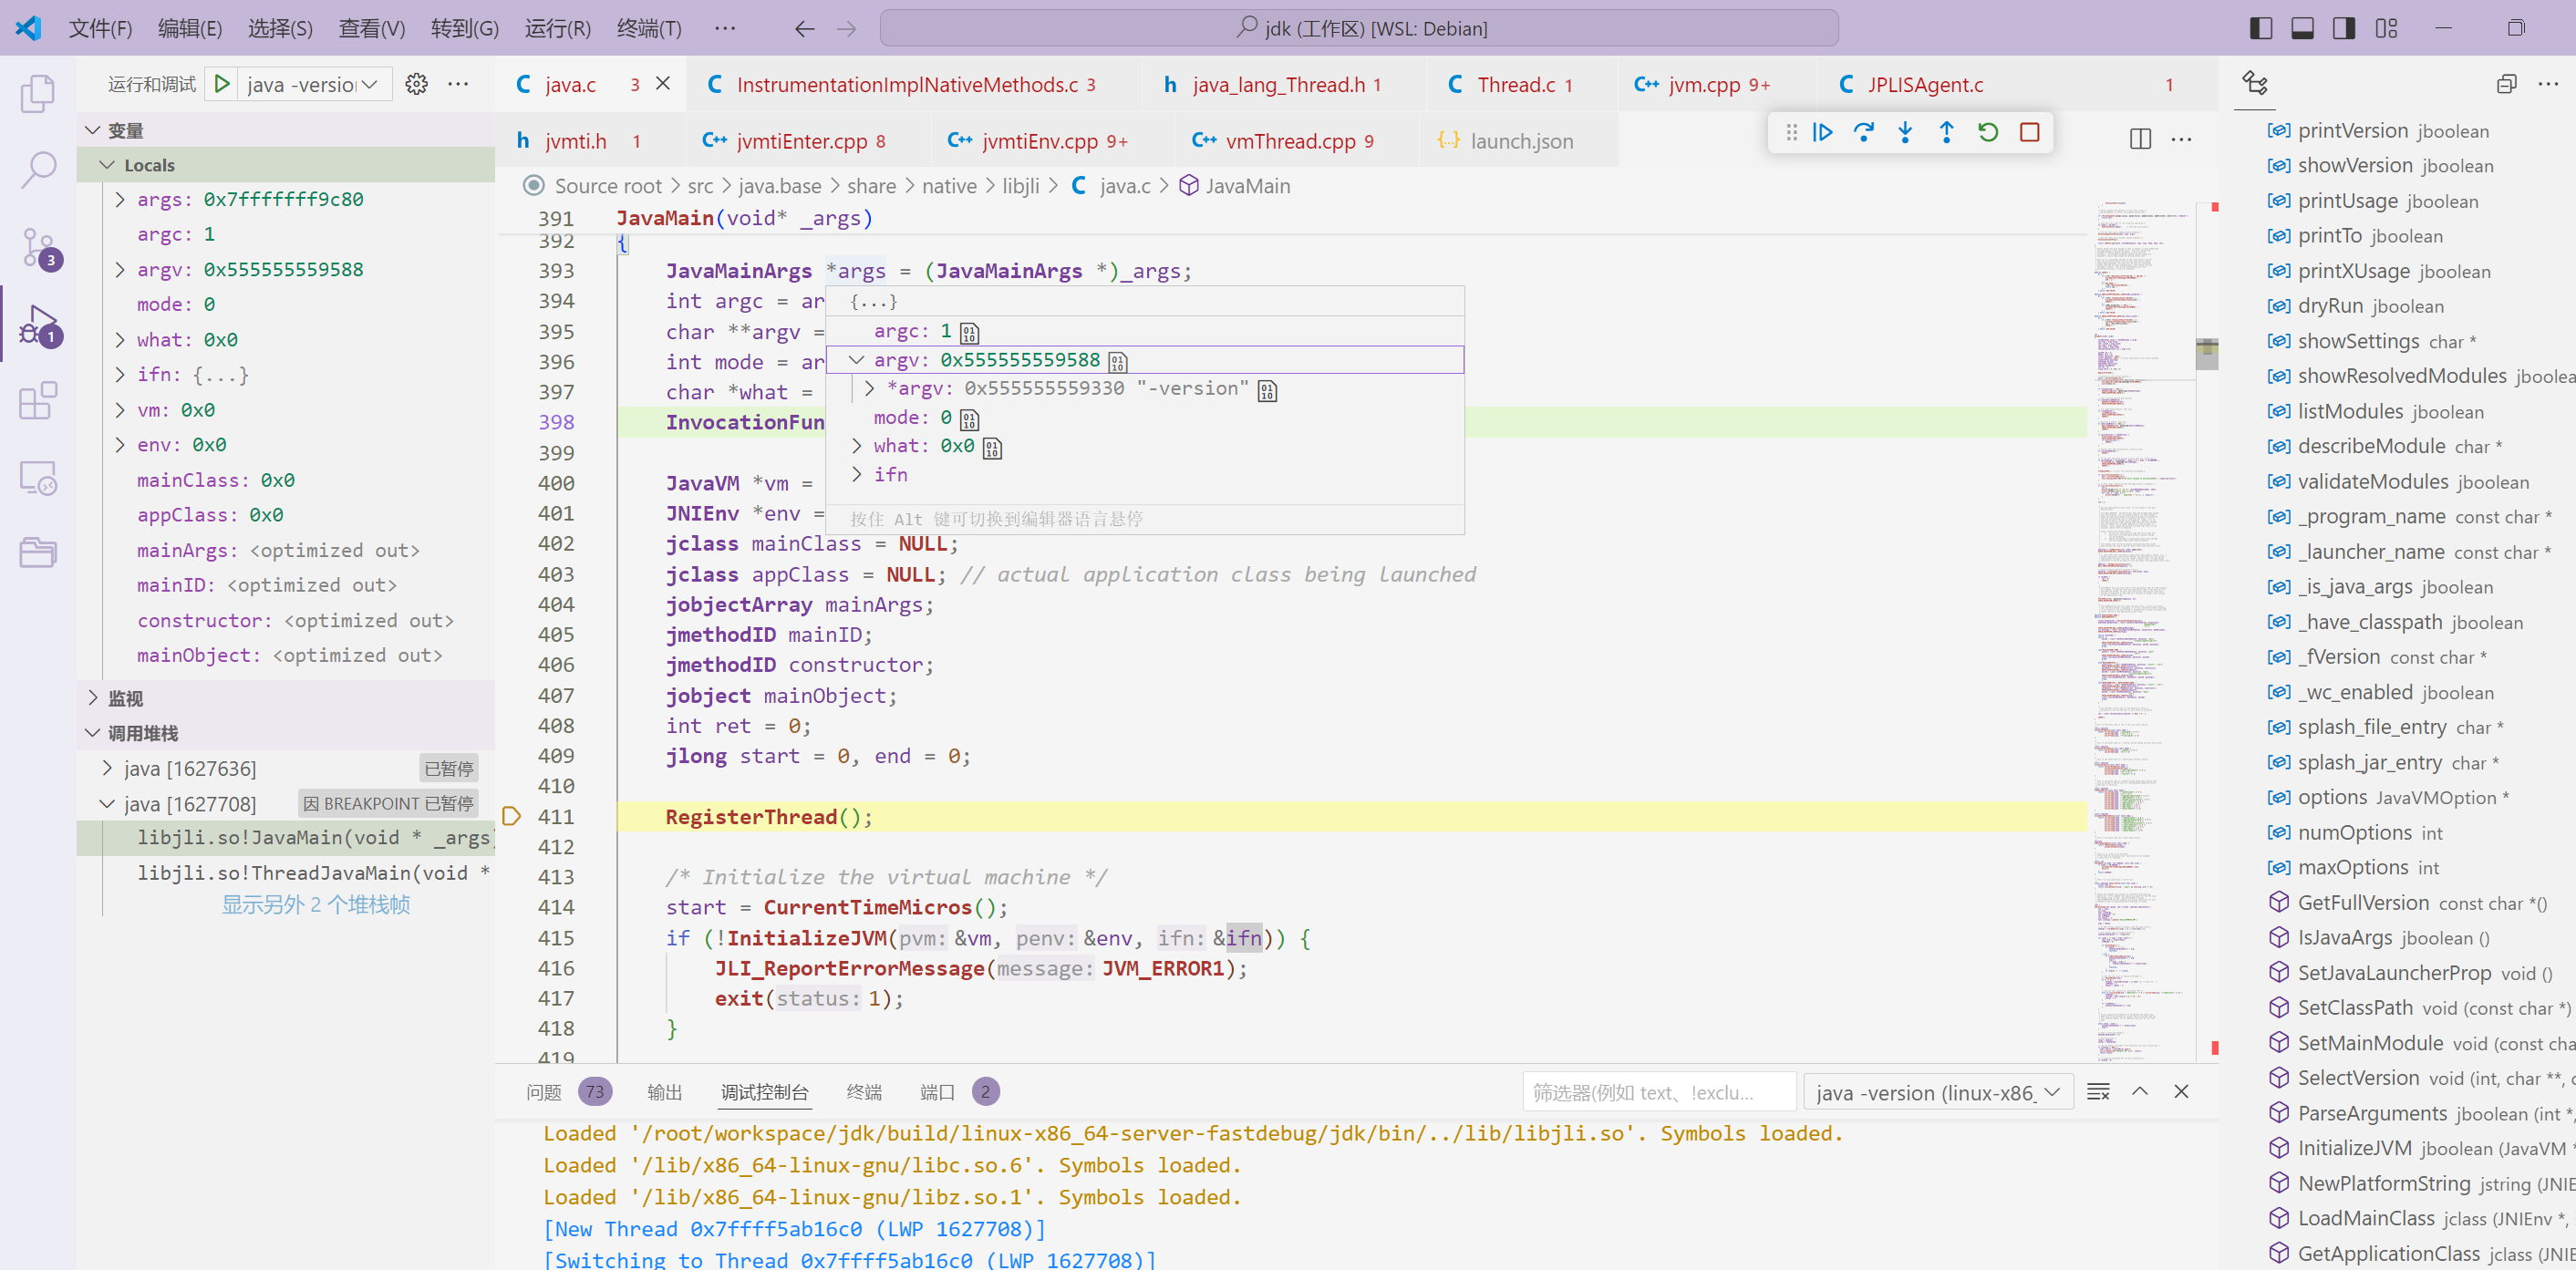
最后打印也正常

调试Arthas
要调试arthas的核心功能,必须要一个宿主程序才行,因为arthas的实现是基于JVM的Agent机制的。而Agant本质是一个运行在目标JVM的程序,所以要调试Arthas的核心程序,必须先把这个Agent程序attach到目标程序之后才能进行源码的debug。
下面添加一个目标启动程序,以远程debug的形式启动。
{
    "name": "java -jar",
    "type": "cppdbg",
    "request": "launch",
    "program": "/root/workspace/jdk/build/linux-x86_64-server-fastdebug/jdk/bin/java",
    "stopAtEntry": false,
    "args": ["-Xdebug", "-Xrunjdwp:transport=dt_socket,server=y,address=8000", "-jar", "/root/workspace/plugin-boot-0.0.1-SNAPSHOT.jar"],
    "cwd": "/root/workspace/jdk",
    "environment": [],
    "externalConsole": false,
    "preLaunchTask": "Make 'exploded-image'",
    "osx": {
        "MIMode": "lldb",
        "internalConsoleOptions": "openOnSessionStart",
    },
    "linux": {
        "MIMode": "gdb",
        "setupCommands": [
            {
                "text": "handle SIGSEGV noprint nostop",
                "description": "Disable stopping on signals handled by the JVM"
            }
        ]
    }
}
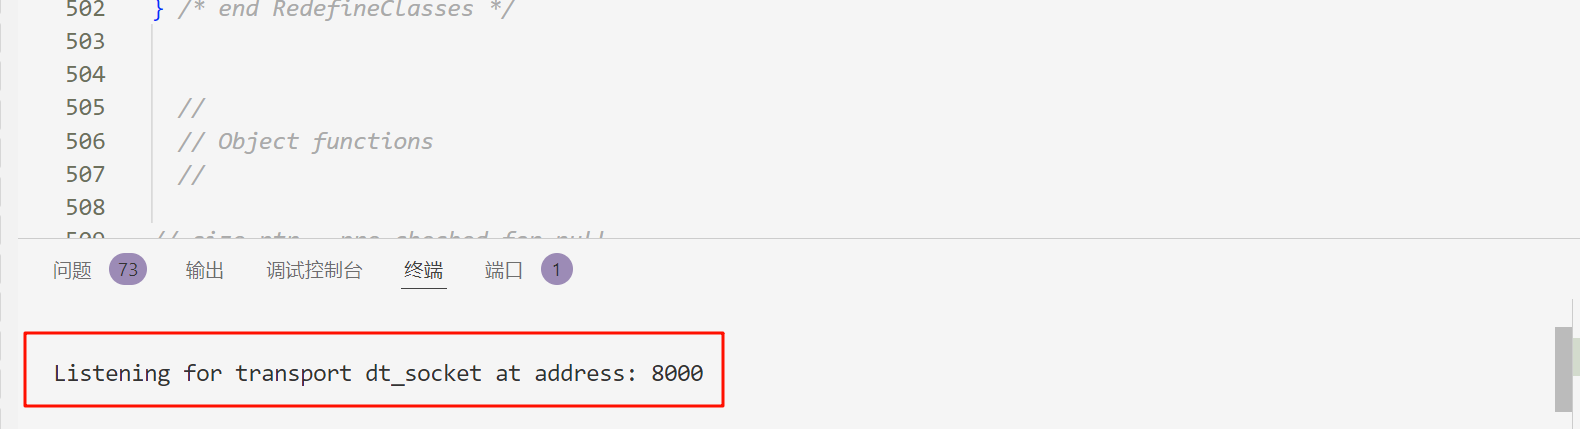
按F5启动debug,启动后可以发现该程序在等连接。
打开Arthas的源码,添加个remote jvm debug的运行配置,端口换成8000,如下:
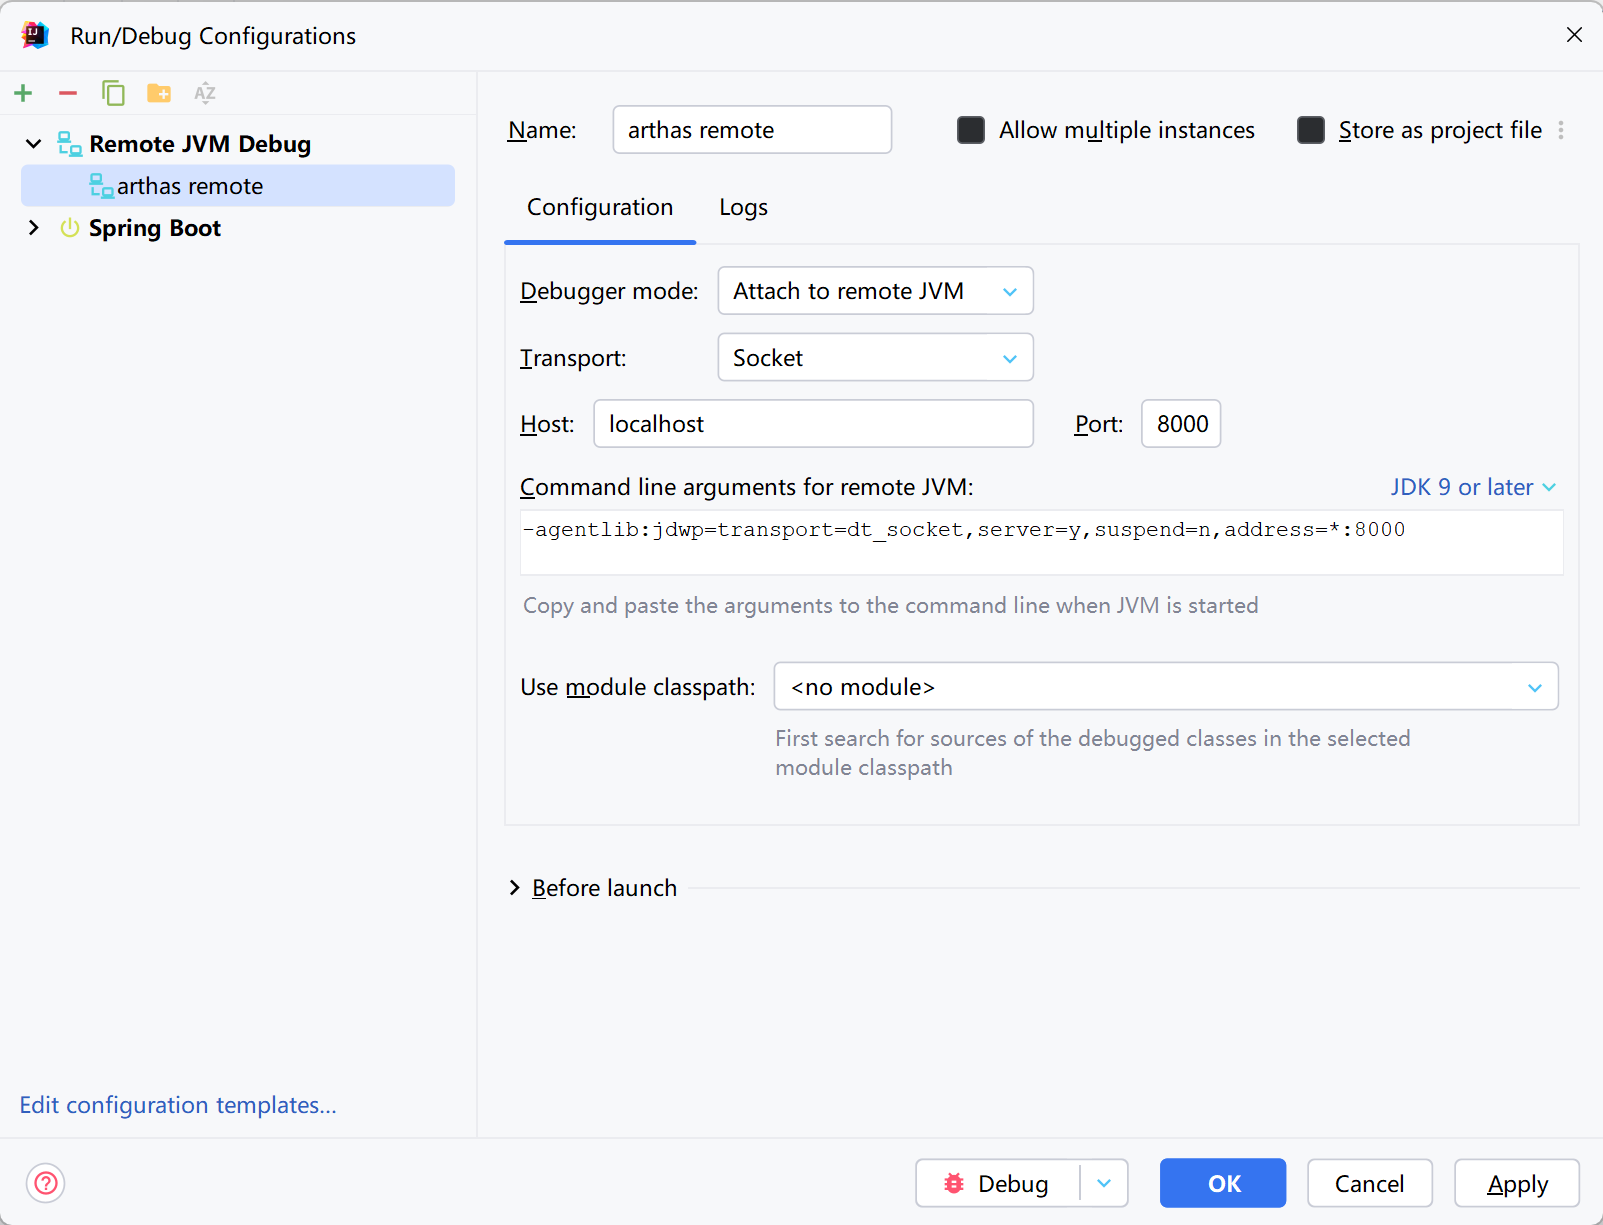
然后直接debug运行,就会连接上上面已经开启远程debug的程序。
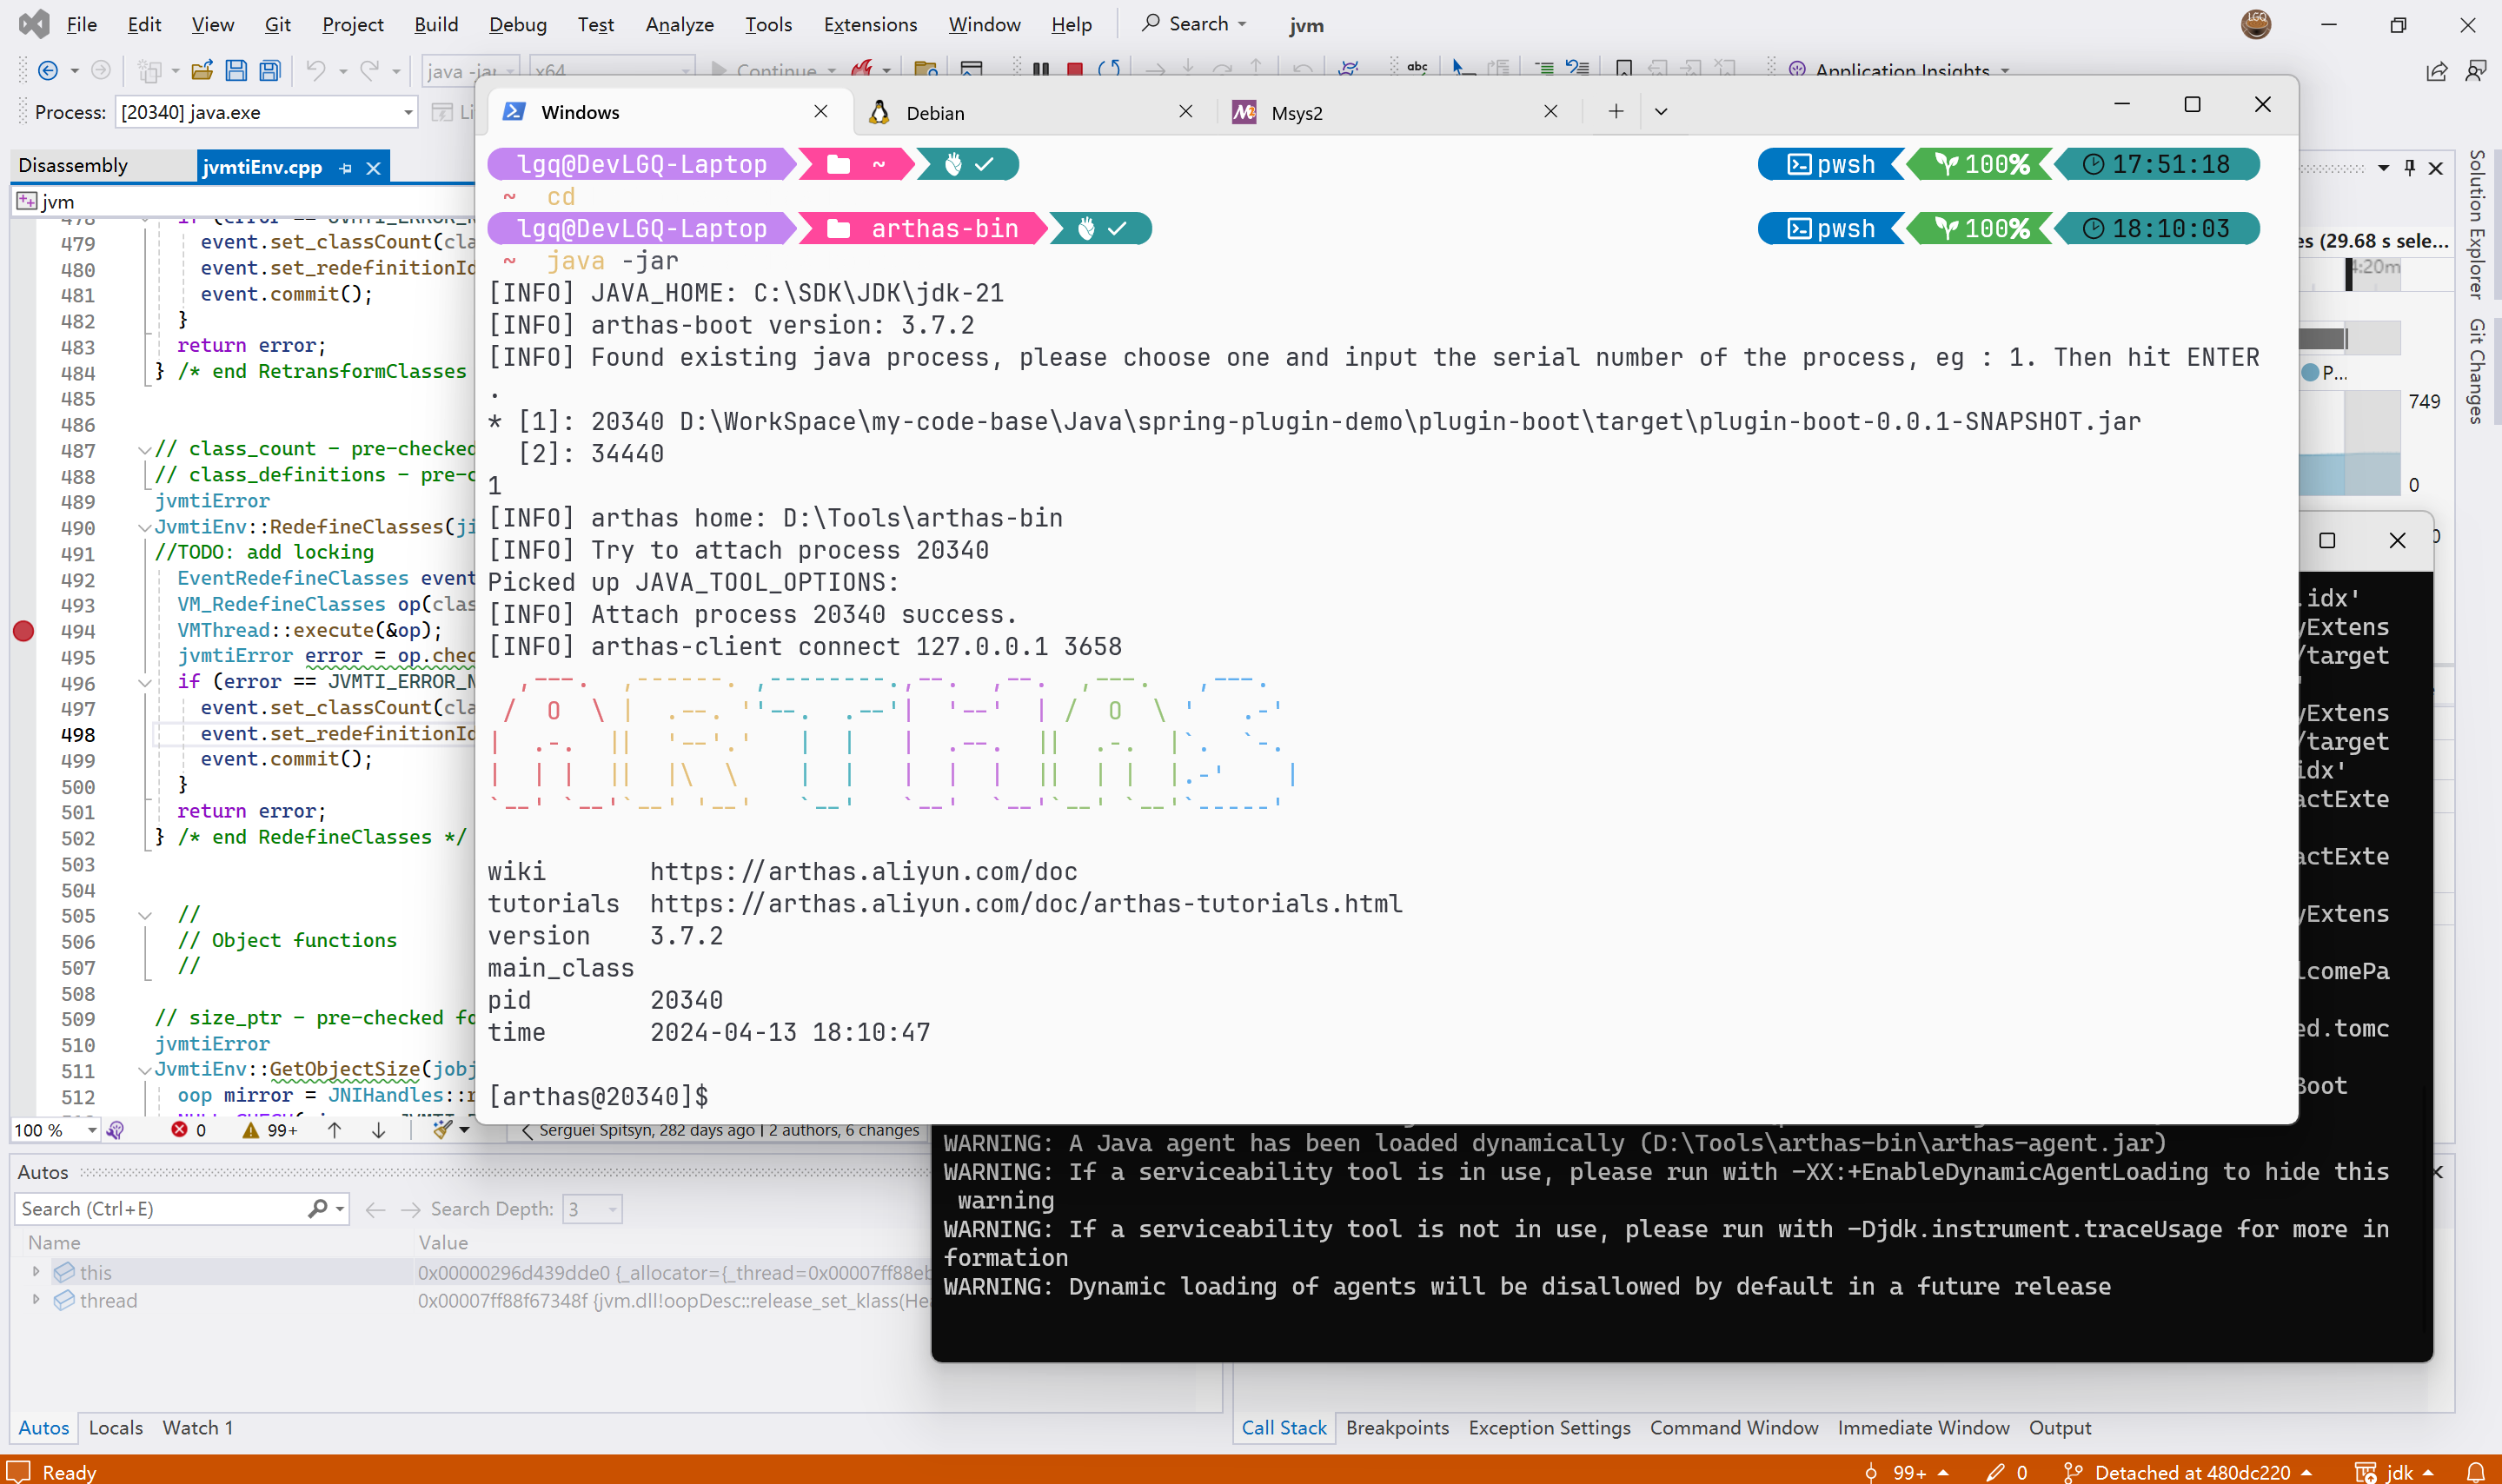
启动arthas,attach上上面启动的java程序。
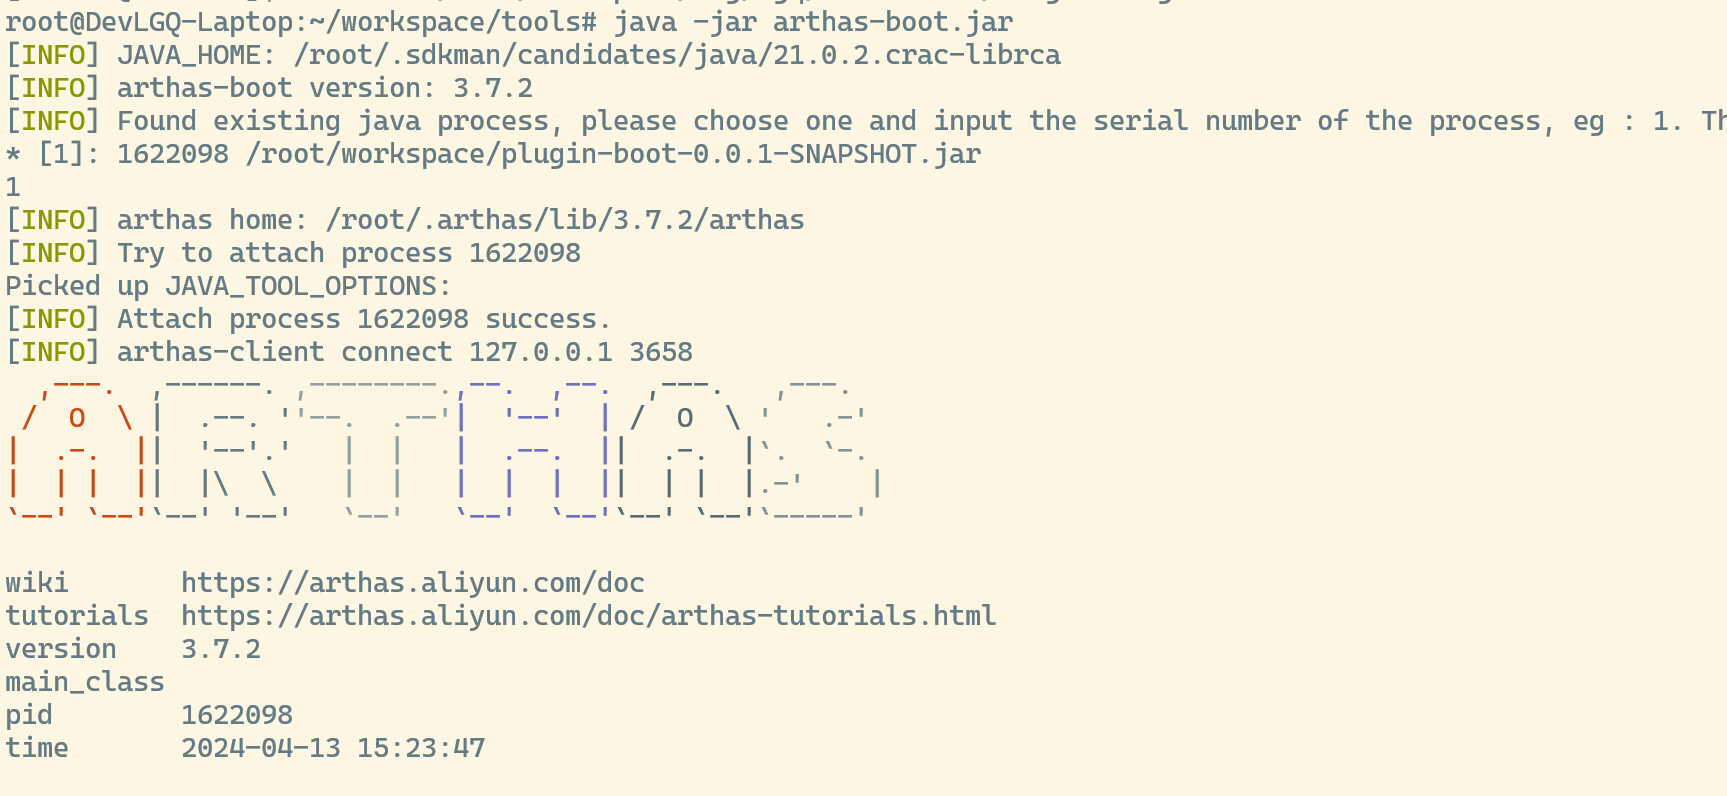
这时候,arthas已经挂载到上面启动的JVM上面了,可以进行debug了。
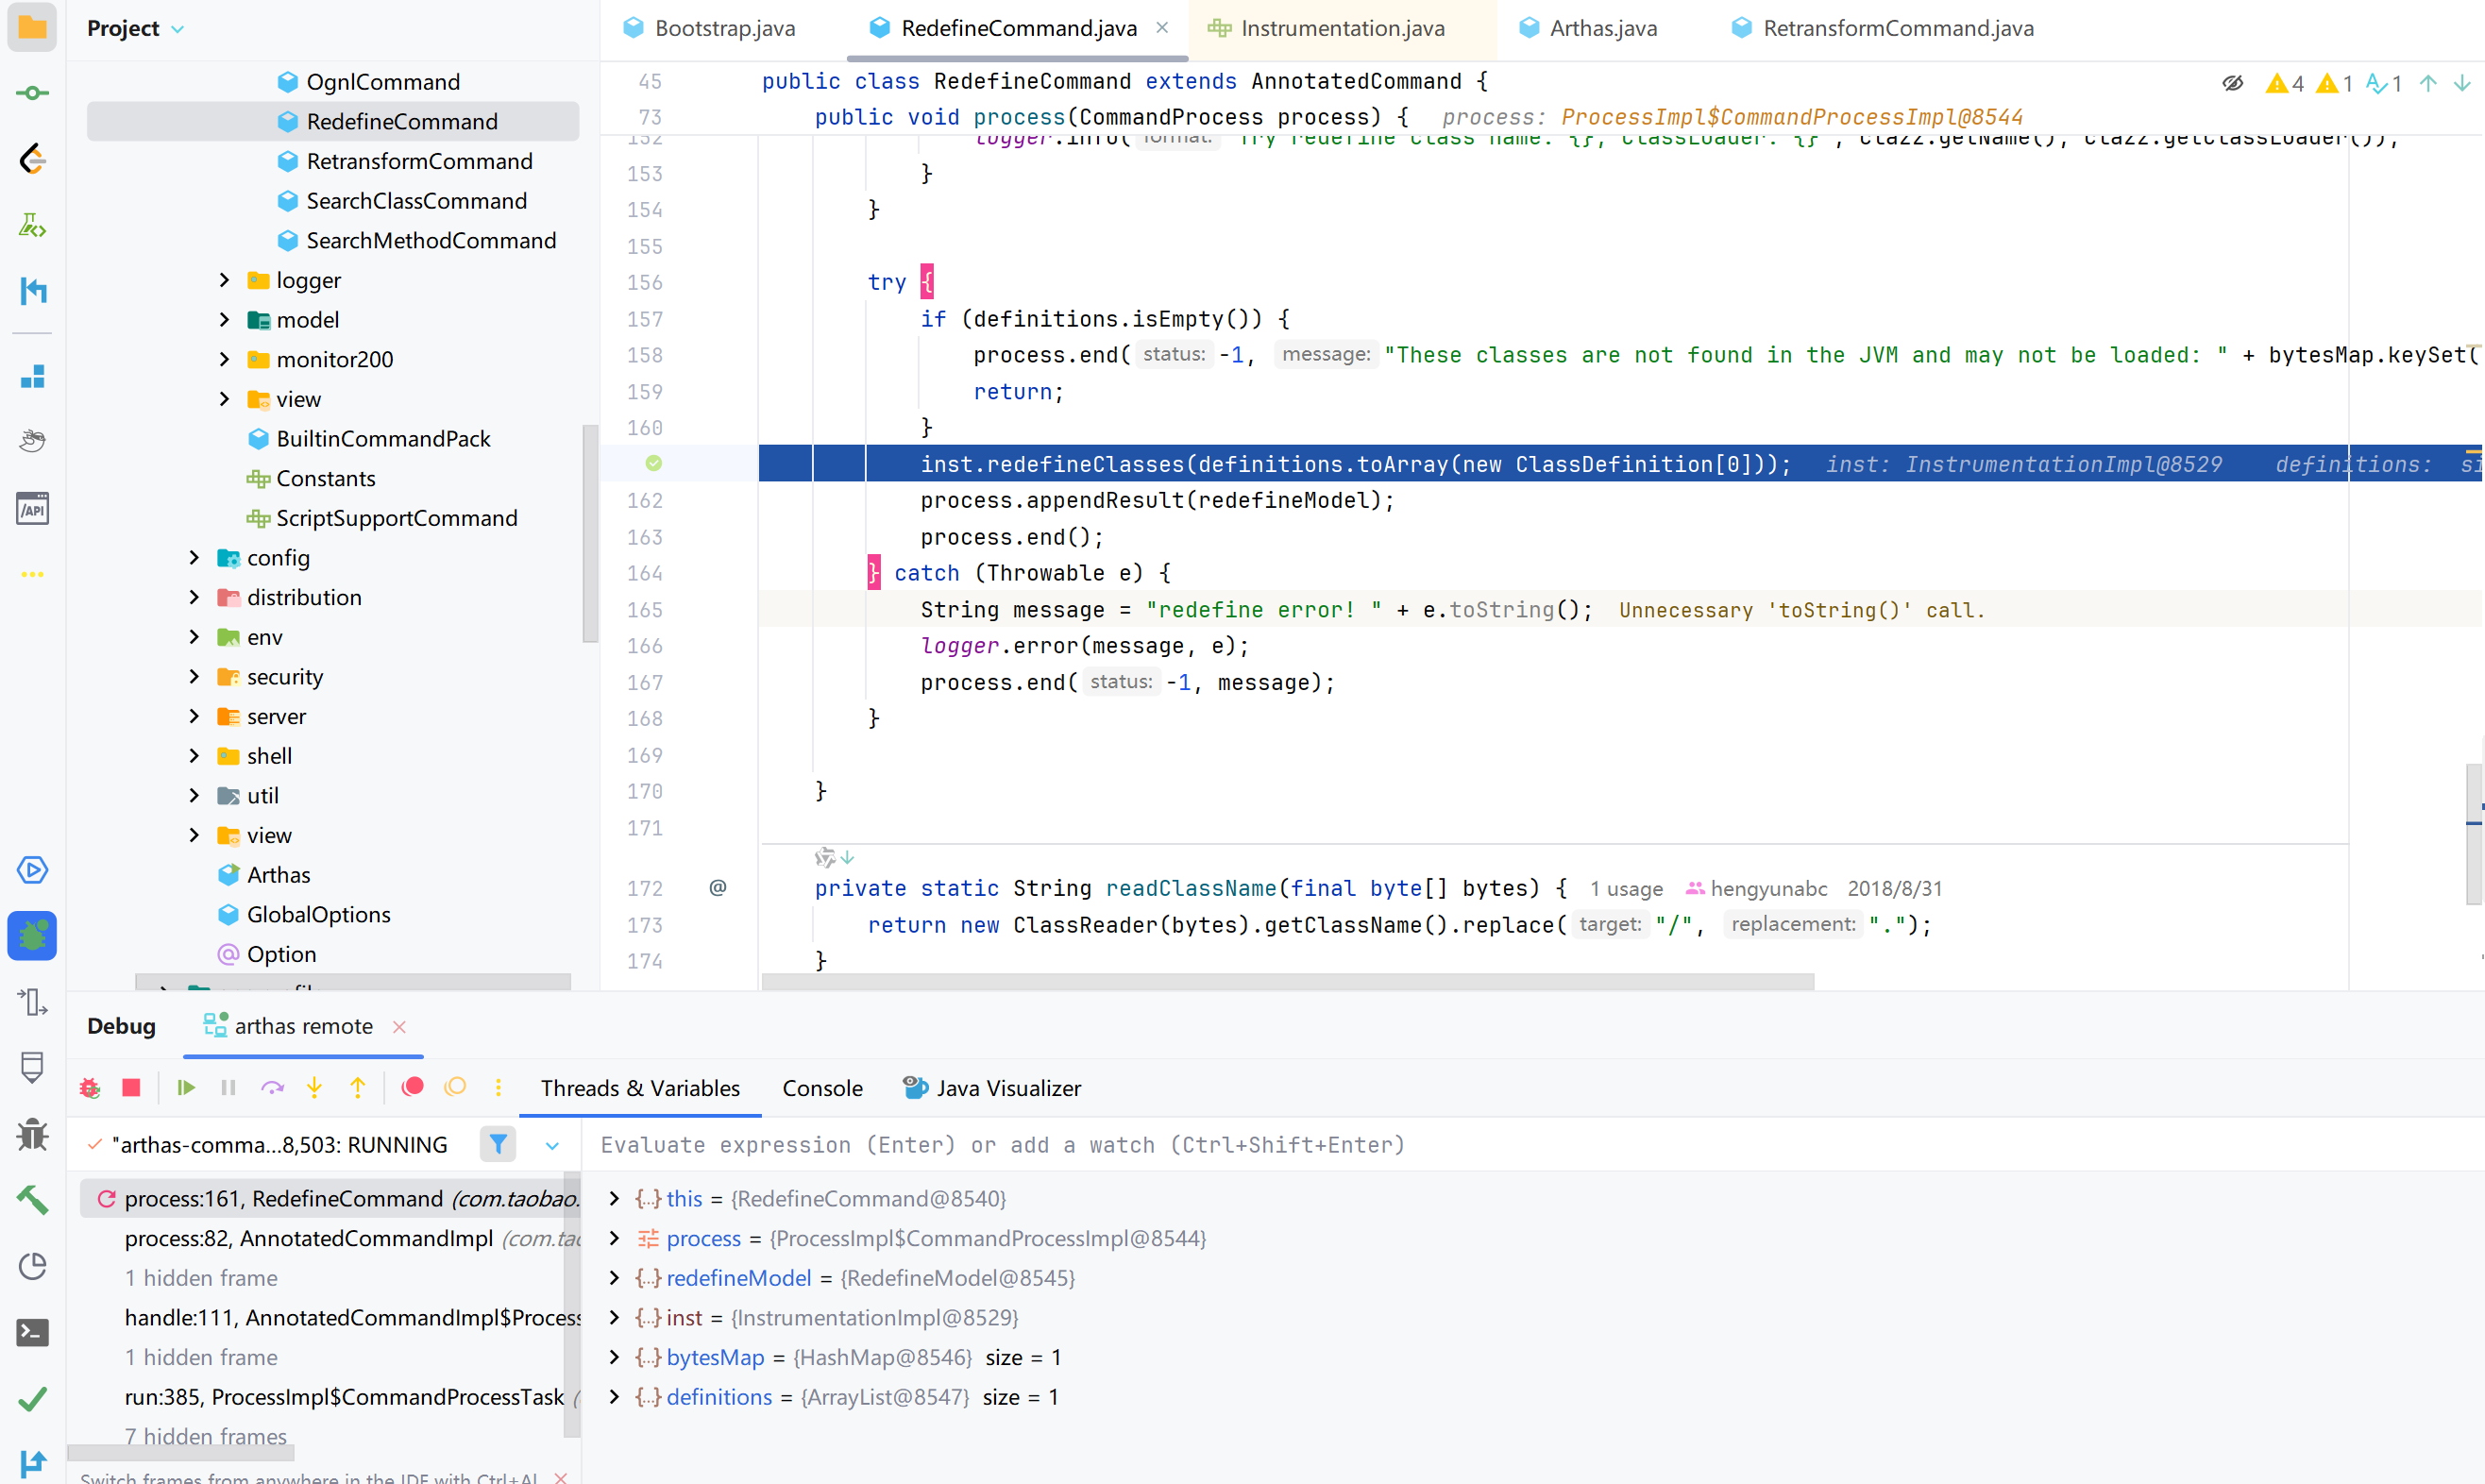
在arthas工程的com.taobao.arthas.core.command.klass100.RedefineCommand#process处打个断点。
在jdk工程的JPLISAgent#redefineClasses方法打个断点。
最后调用redefine指令
redefine /root/workspace/org/lgq/controller/PluginManagerController.class
可以看到,进入了arthas的断点
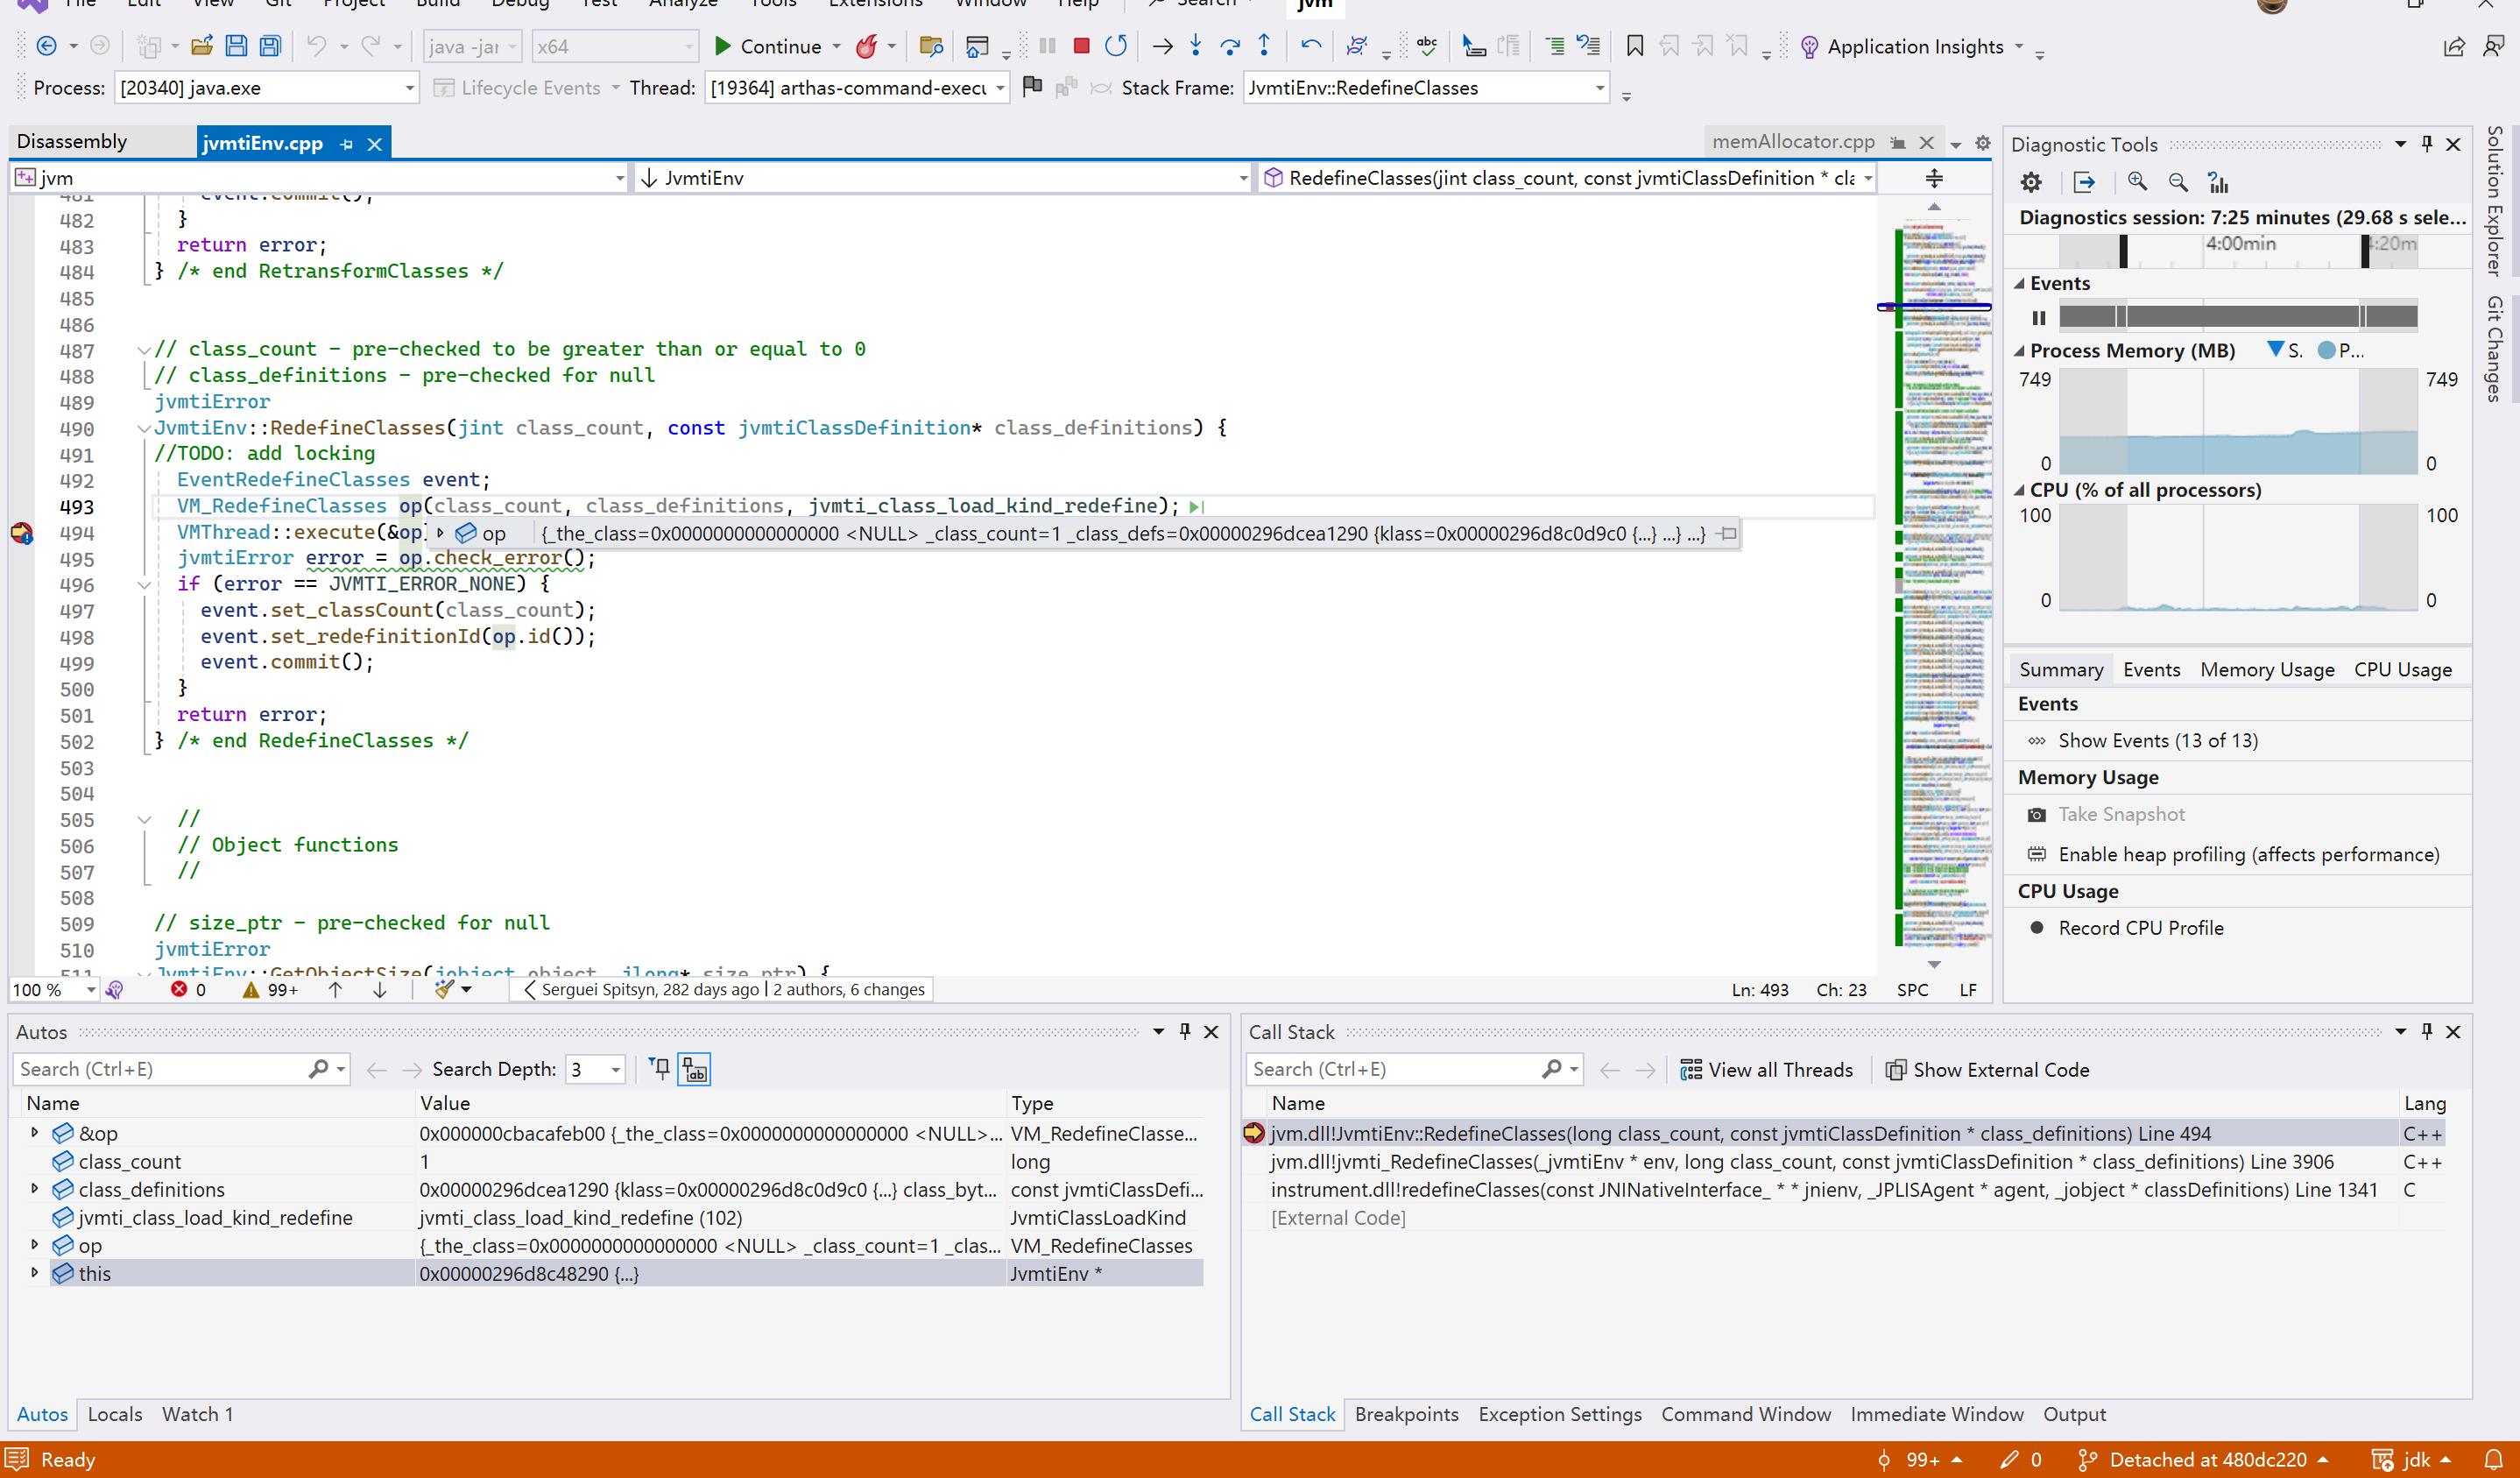
F9放行后,就会进入jdk的断点。在VSC中,F5进入下一个断点;F11逐步调用,可以进入方法内;F10逐过程调用,可以跳过方法在一个方法内进行调试。

继续走下去,可以进入jvmtiEnter#jvmti_RedefineClasses方法,最后进入到核心逻辑在jvmtiEnv#RedefineClasses方法。
使用VS调试JDK
使用vs的话,只能调试Hotspot的本地代码了,生成指令如下:
make hotspot-ide-project
生成文件在 /build/windows-x86_64-server-fastdebug/ide/hotspot-visualstudio 下,使用VS打开jvm.vcxproj文件即可,打开后如下:

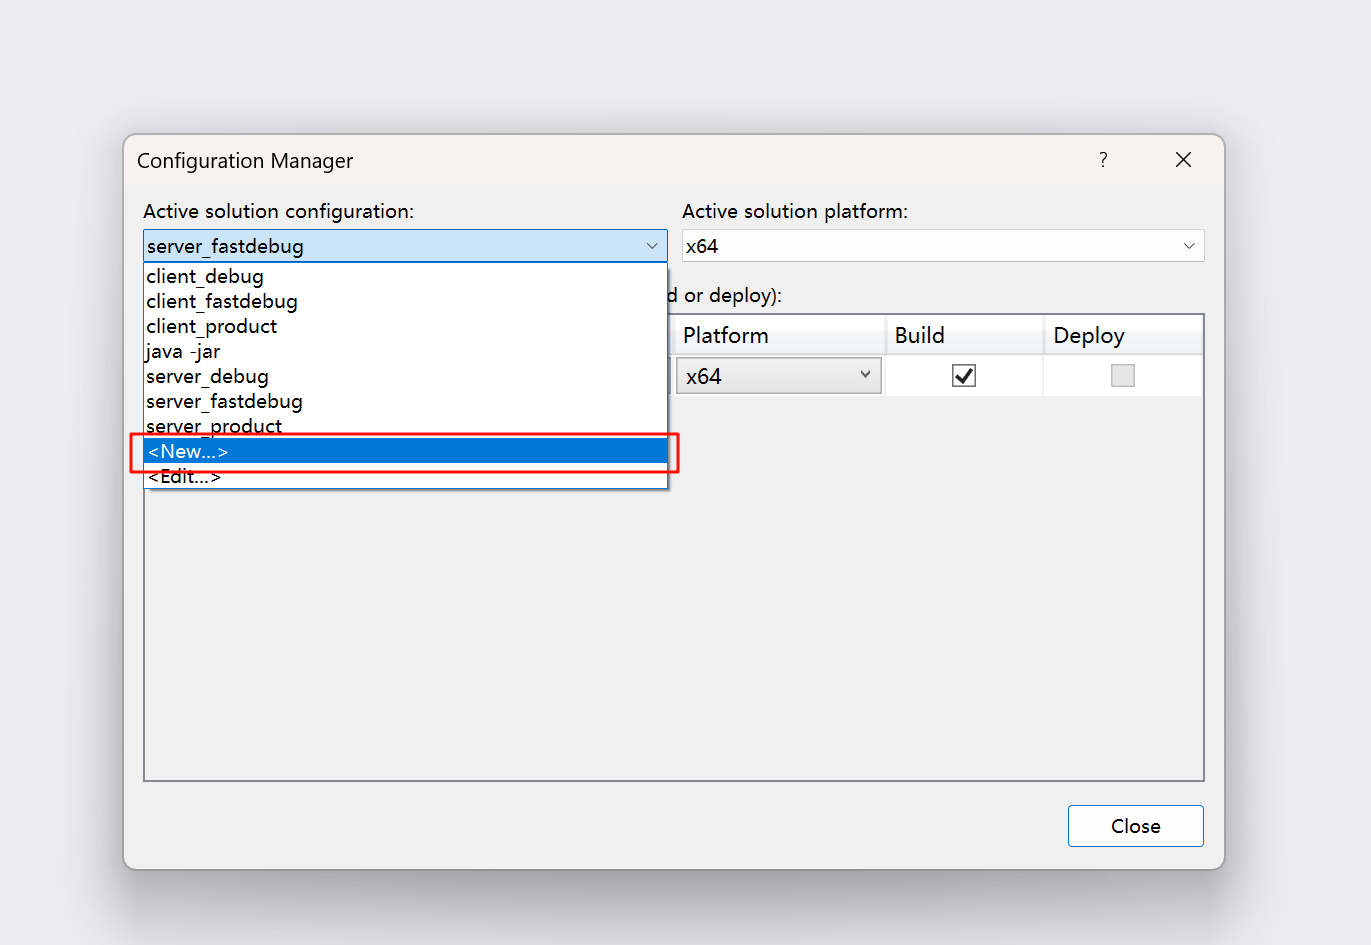
新建一个运行配置,从其中一个复制出来重新命名。
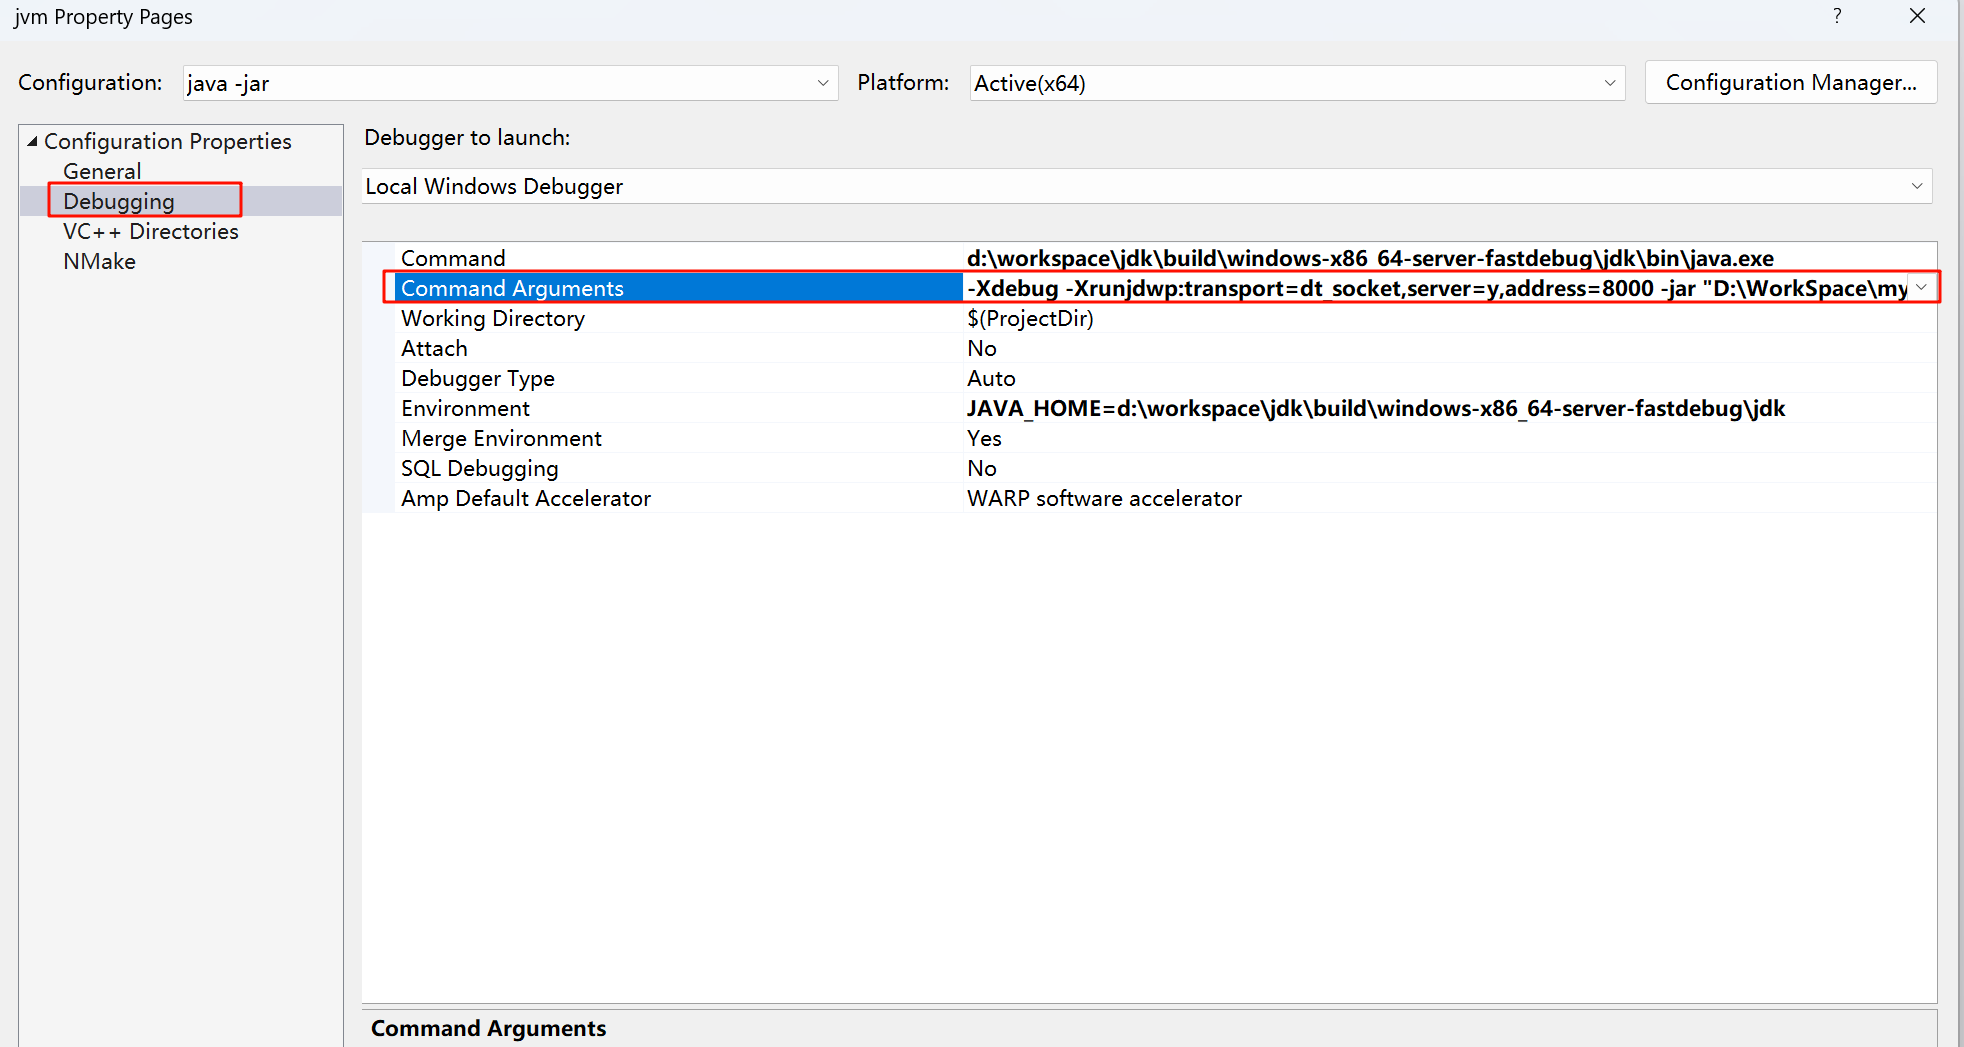
选择解决方案的属性,选择Debugging,修改启动参数。
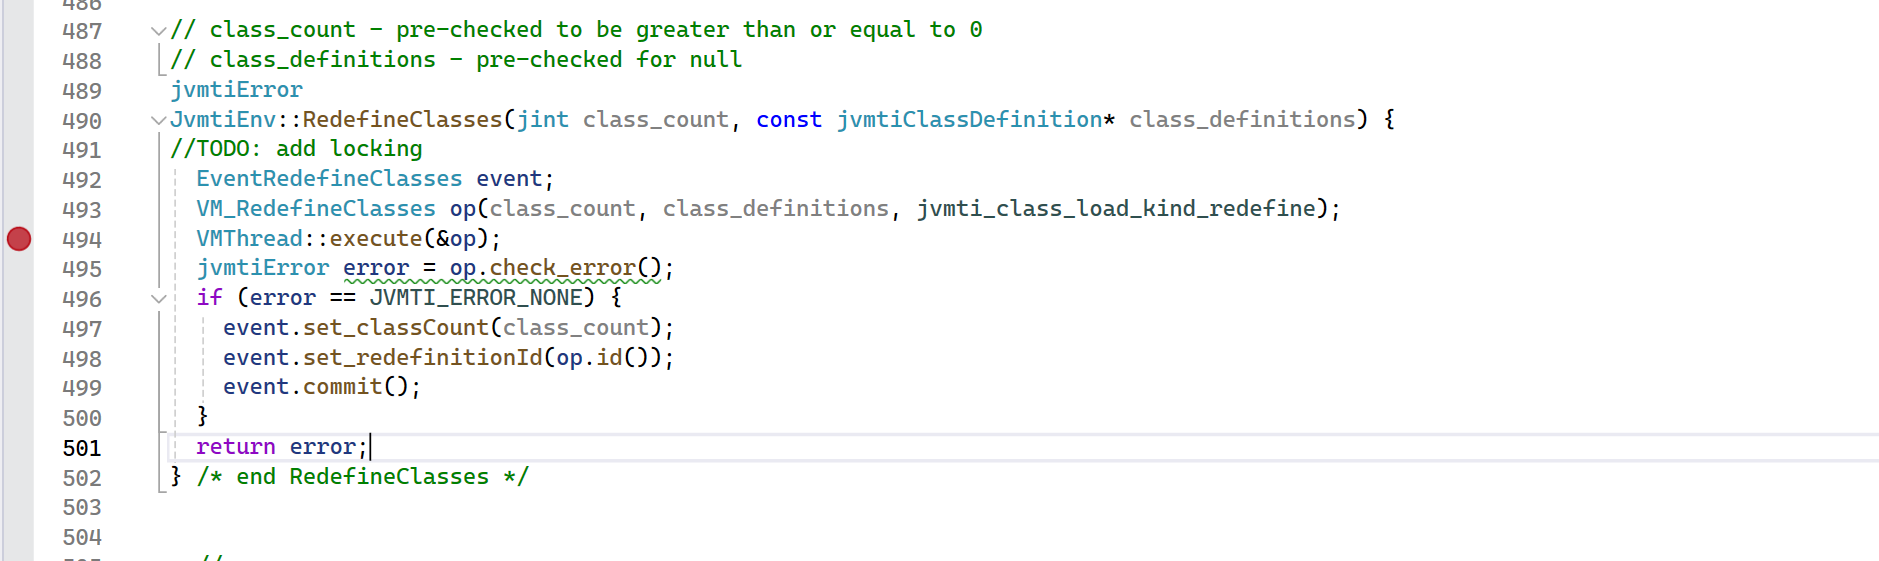
在jvmitEnv#JvmtiEnv::RedefineClasses打个断点后启动。
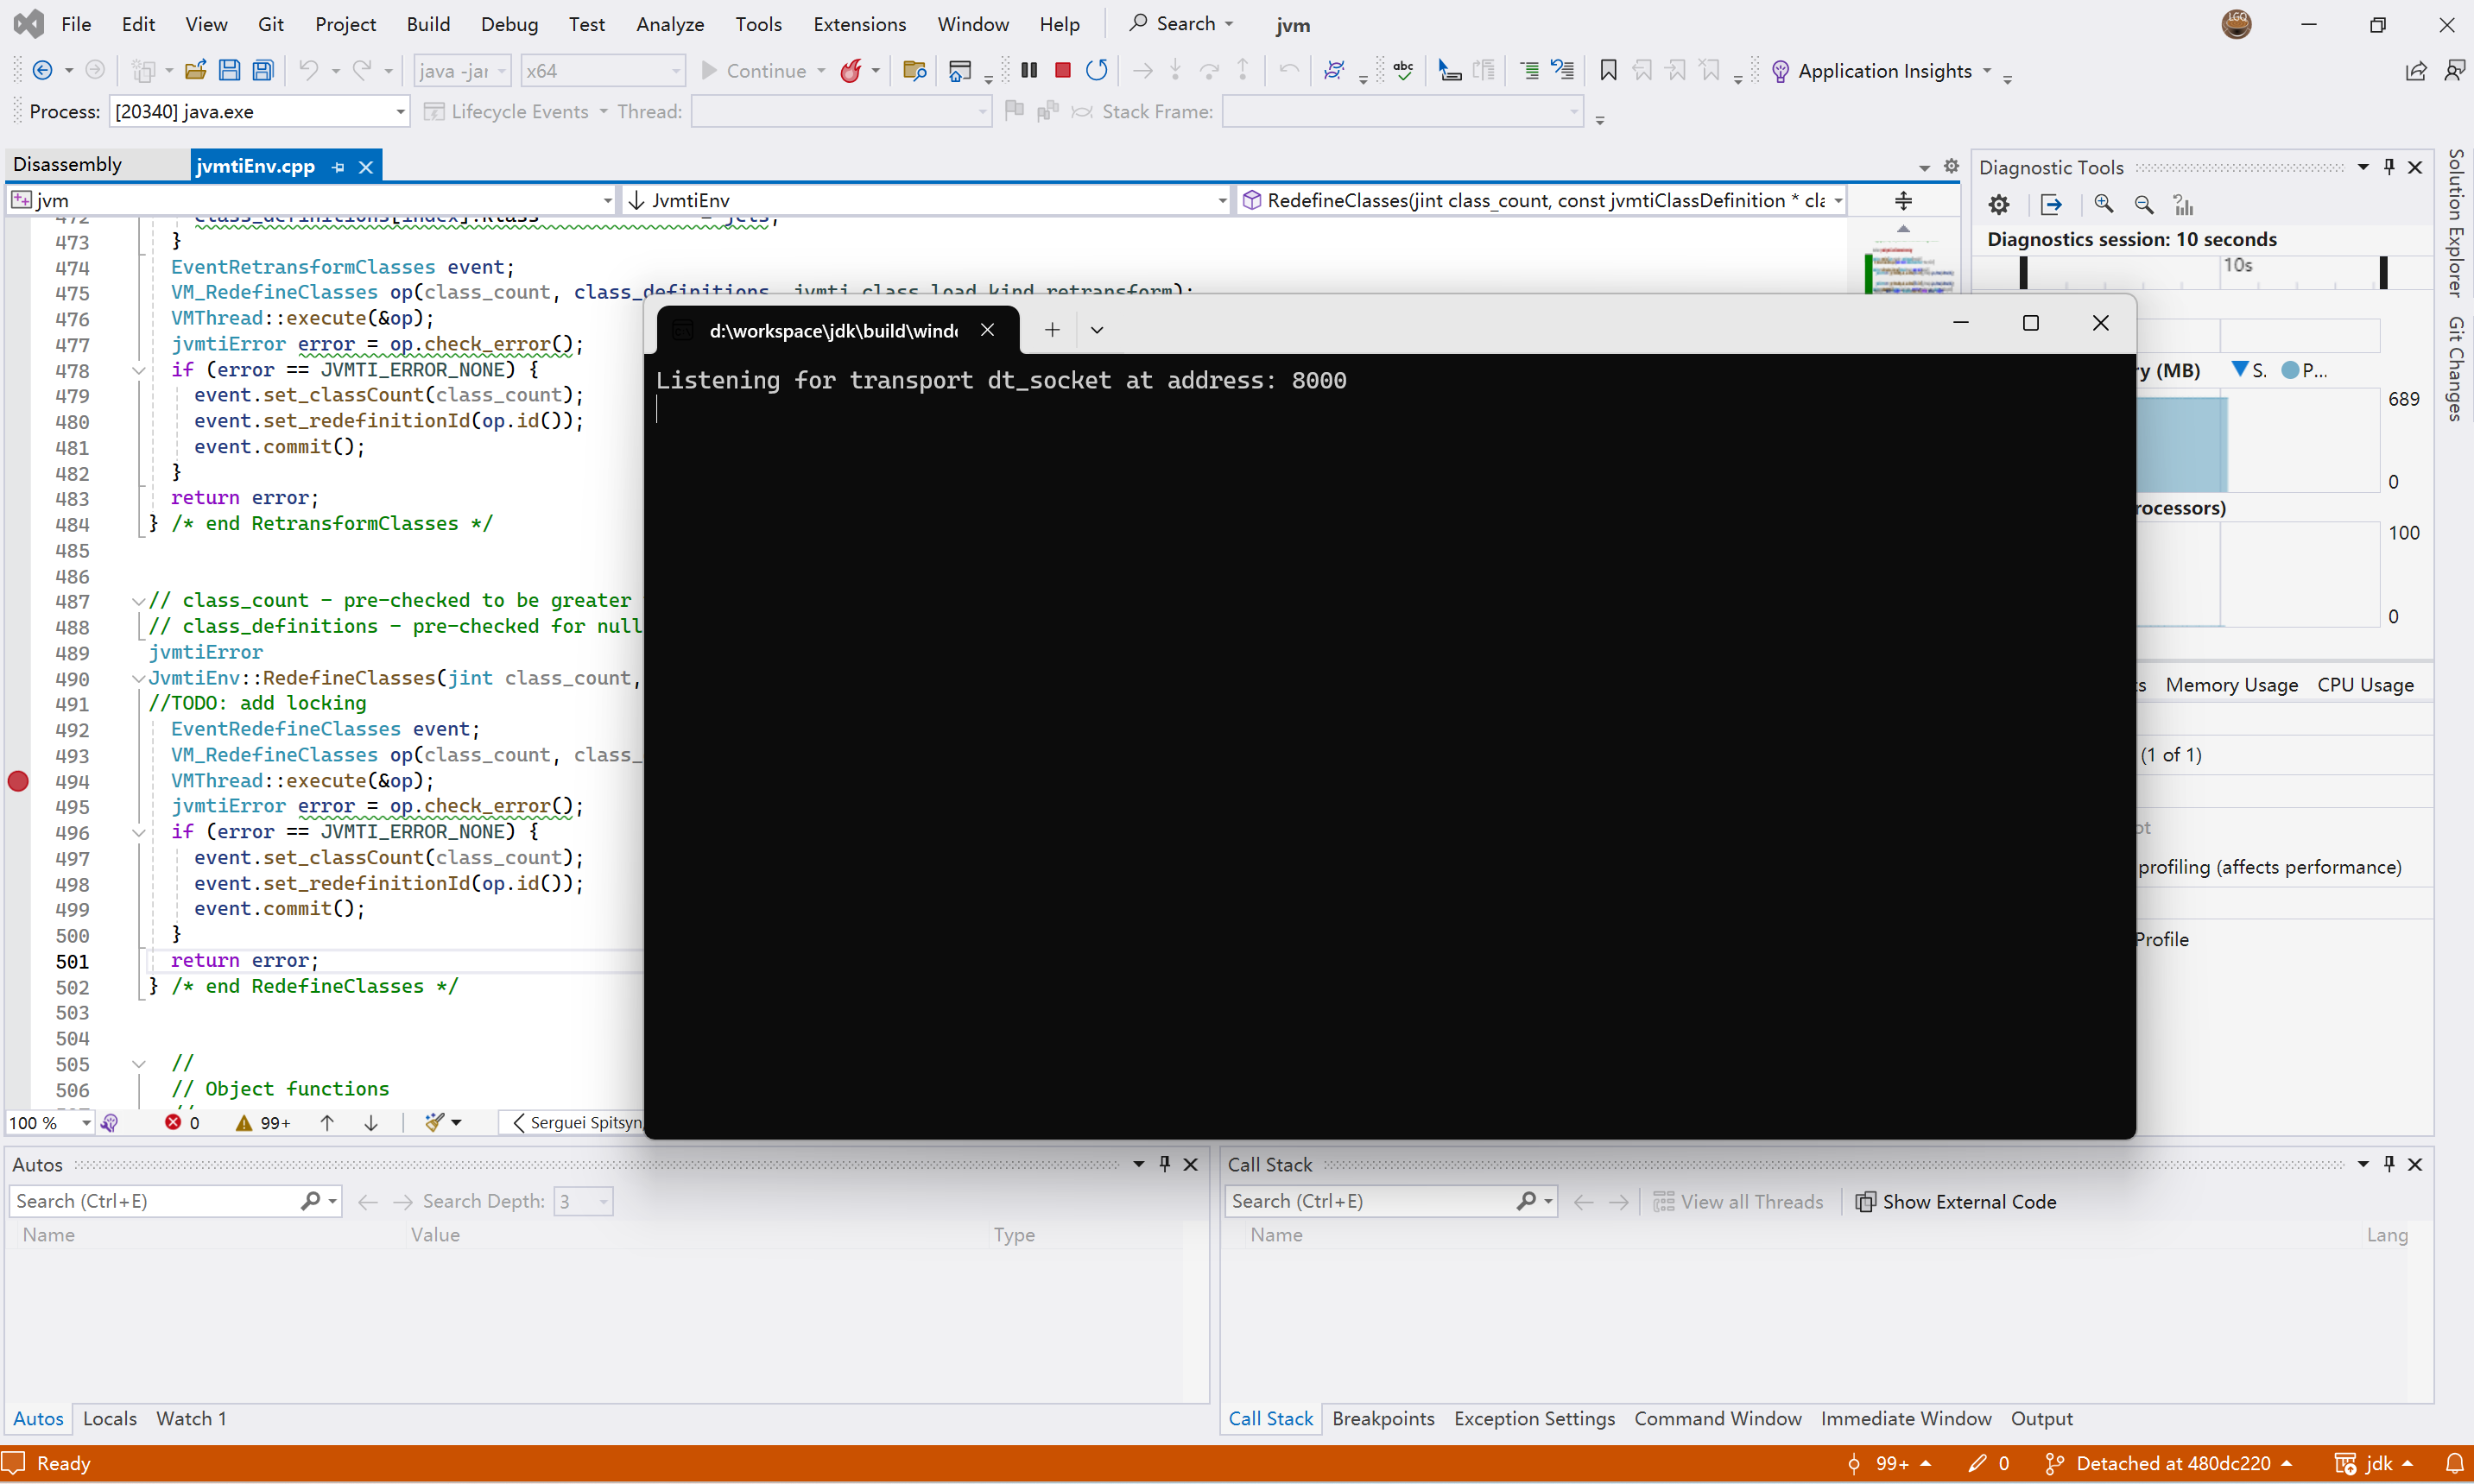
启动后
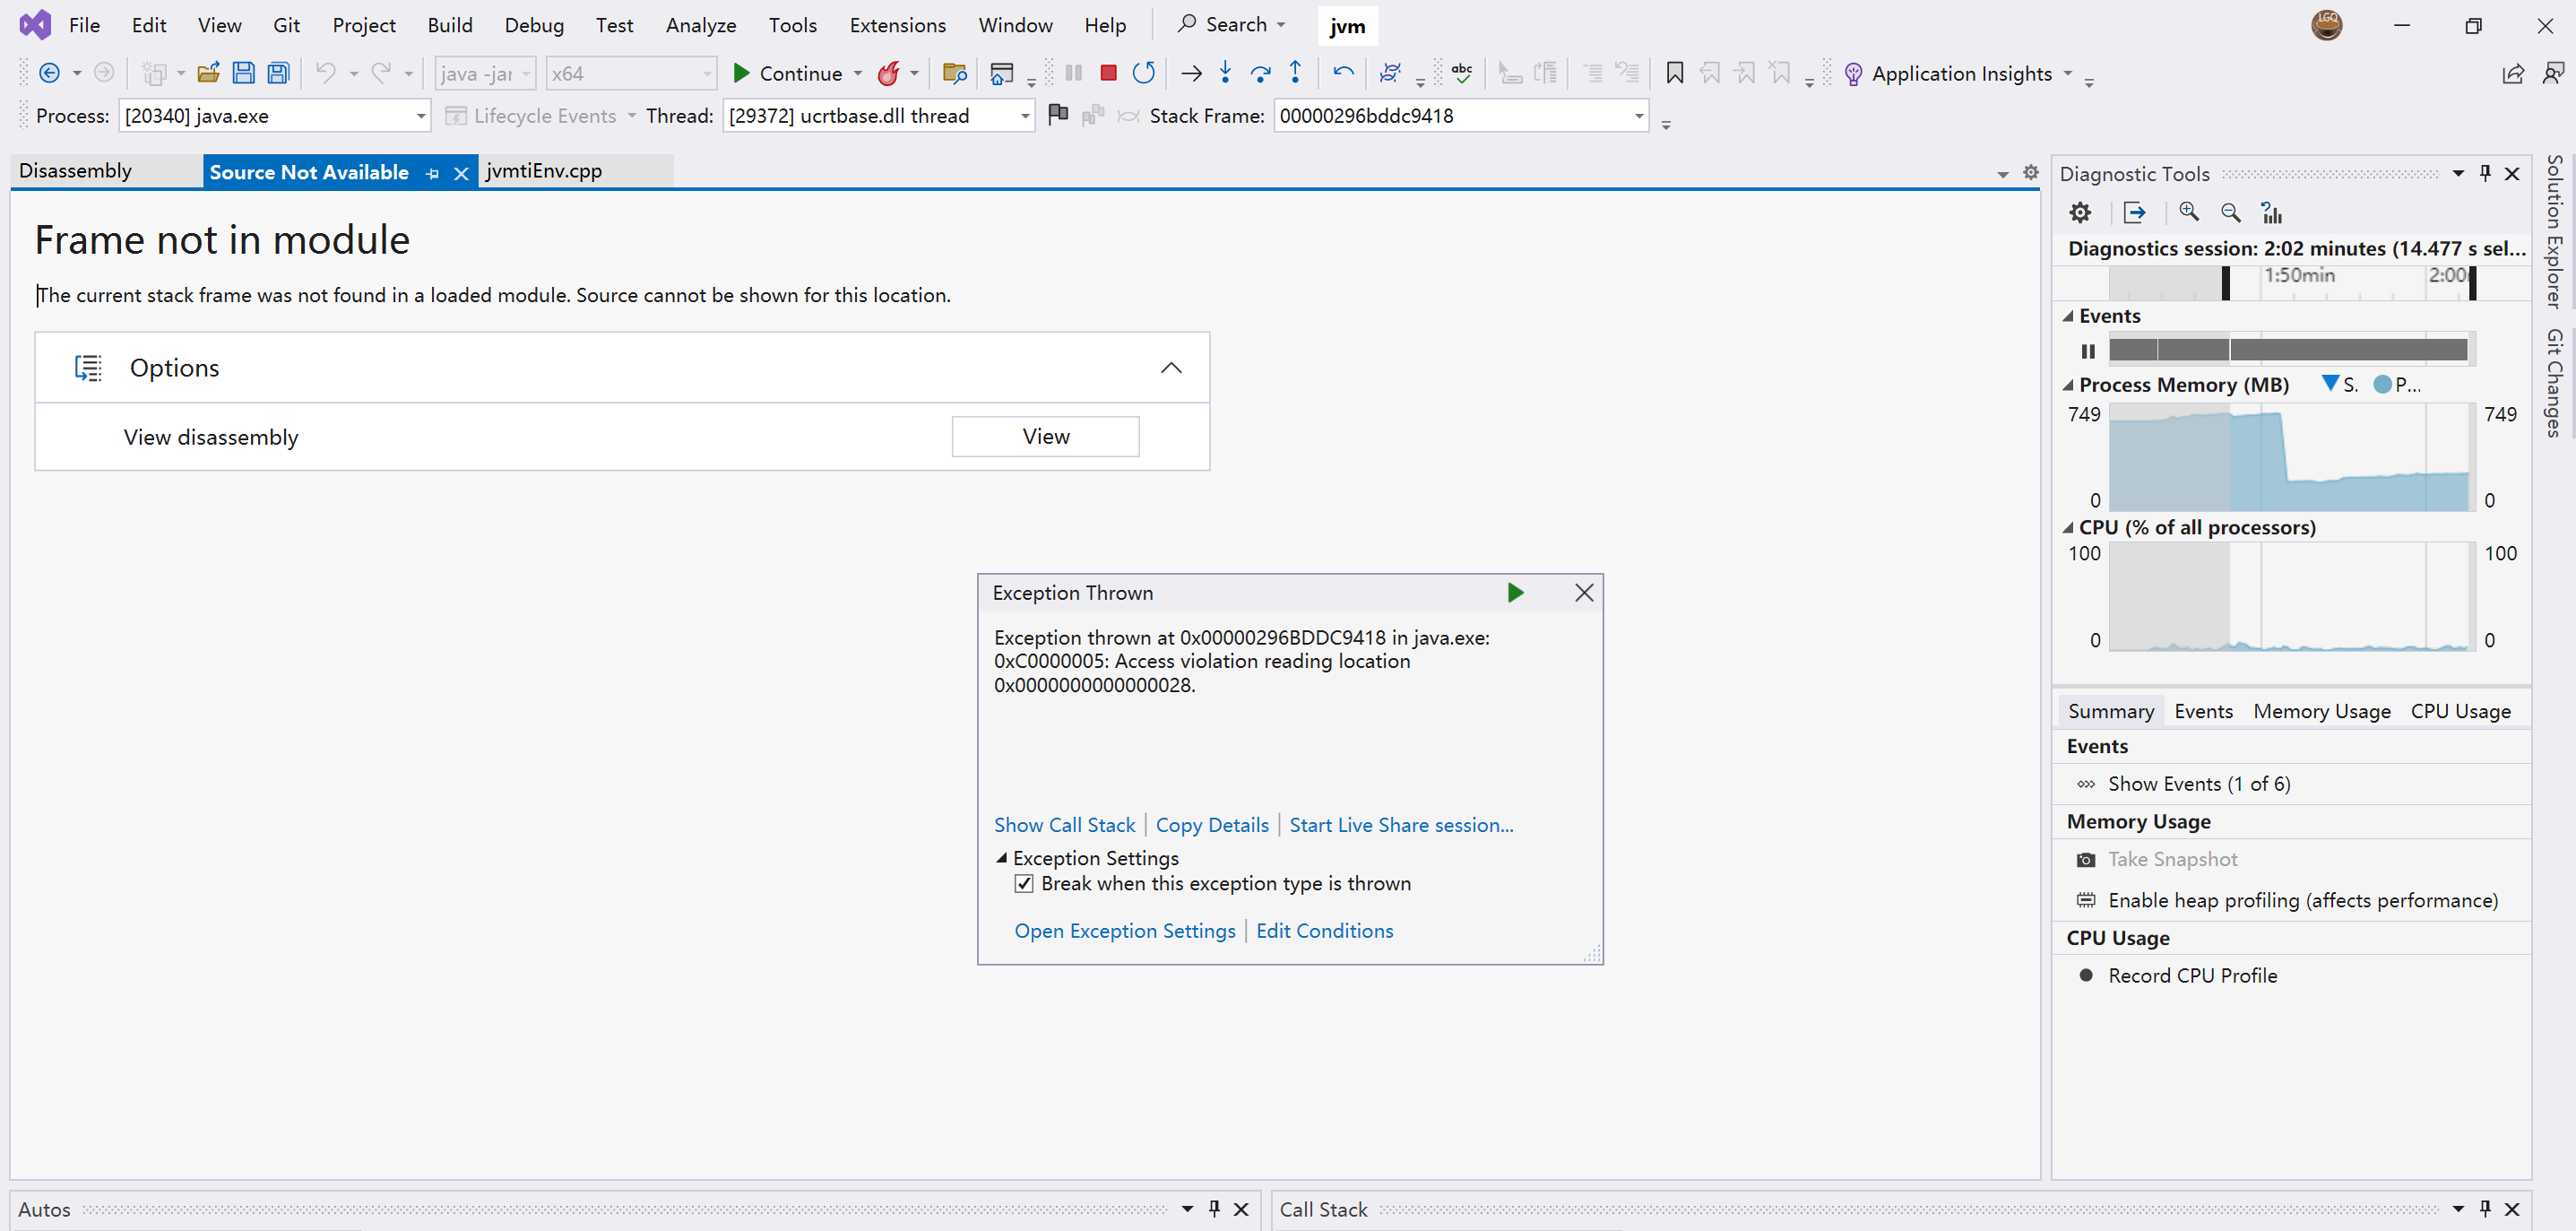
如果碰到异常的话,跳过即可
启动Remote JVM Debug程序连接,再启动arthas进行attach。
这时候就可以使用指令进行调试了。
redefine "D:\WorkSpace\my-code-base\Java\spring-plugin-demo\plugin-boot\target\classes\org\lgq\controller\PluginManagerController.class"
顺利进入断点
调试JDK的Java代码
生成idea项目
执行根目录下的bin/idea.sh脚本,注意,脚本依赖ant,需要先配置ANT_HOME环境变量,ant下载地址。
./idea.sh
执行完成之后,使用idea打开该文件夹。
打开后,设置该项目的jdk为自己编译的jdk,目录应该为build/<config>/images/jdk。
构建jtreg插件
# 下载源码
git clone https://github.com/openjdk/jtreg.git
# 进入插件构建目录
cd jtreg/plugins/idea
# 构建
./gradlew.bat clean build
出现异常exception in phase 'semantic analysis' in source unit '_BuildScript_' Unsupported class file major version 65。
这个问题是因为gradle 7.6的版本不支持jdk 21导致的,而我的环境现在默认gradle使用jdk21。解决这个问题,在项目的gradle.properties中添加org.gradle.java.home变量并指定使用jdk17的。
继续执行,如果没有配置jtregHome变量会出现以下异常:
* Where:
Build file 'D:\WorkSpace\jtreg\plugins\idea\build.gradle' line: 8

* What went wrong:
A problem occurred evaluating root project 'jtreg-plugin'.
> Could not find jtreg in /path/to/jtreg.
  Please make sure that 'jtregHome' in 'gradle.properties' points to a valid jtreg root.
  . Expression: this.file(jtregLib).exists()
在gradle.properties修改jtregHome变量。jtreg可以从上面给的地址下载,也可以自己编译。最后配置如下:
jtregHome = D:/Tools/jtreg
minBuild = IC-231.9011.34
pluginVersion = 1.16
javaLevel = 17
org.gradle.java.home = C:/SDK/JDK/jdk-21
notes = <ul>\
<li>CODETOOLS-7903300: Add test library support to jtreg plugin</li>\
</ul>
如果minBuild不合符自己的idea版本,记得要修改下minBuild的版本,可以在 https://www.jetbrains.com/intellij-repository/releases/ 中看有效的构建版本号。
再次执行,构建成功。
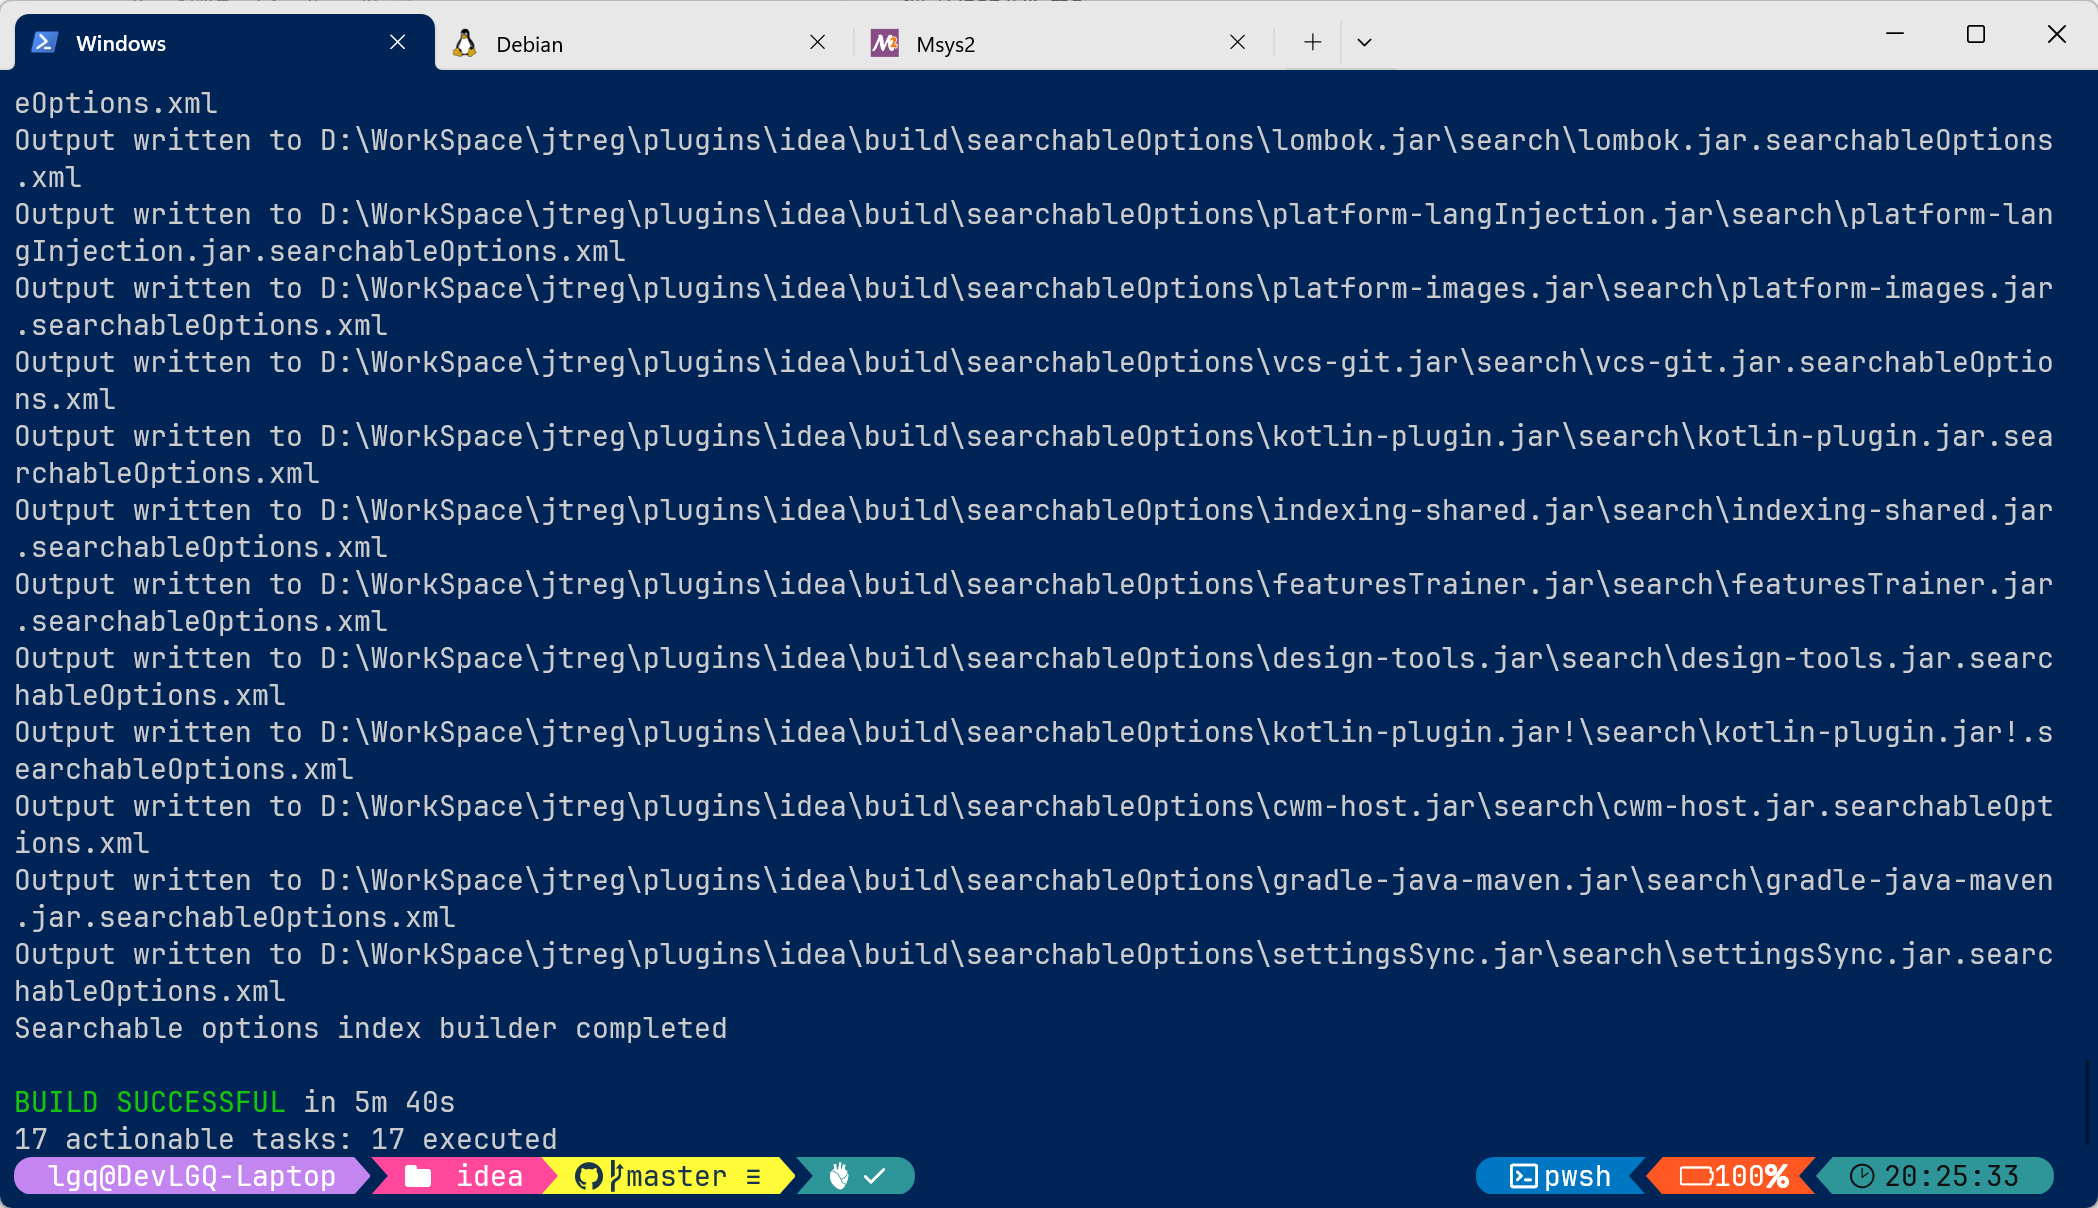
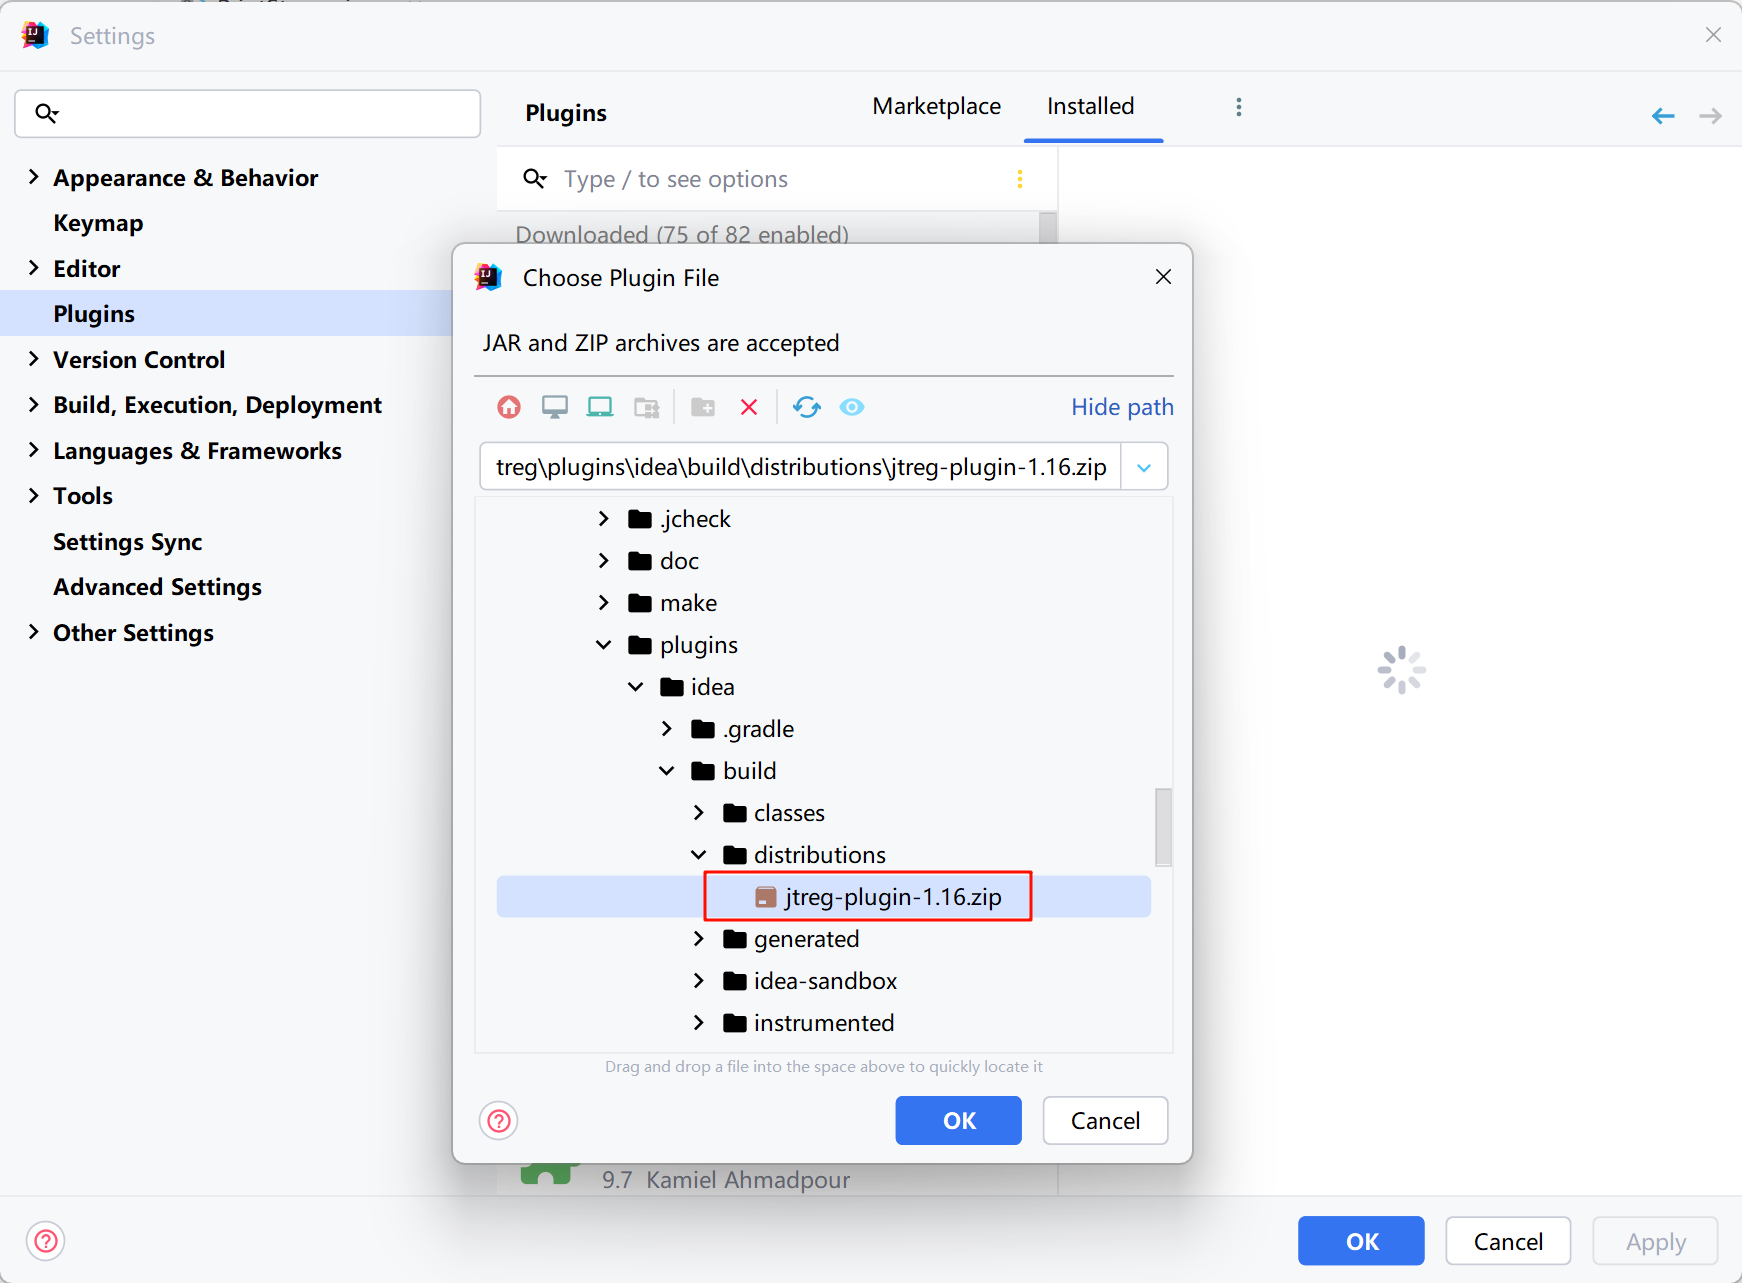
最后插件会在build\distributions目录下,打开idea安装插件:
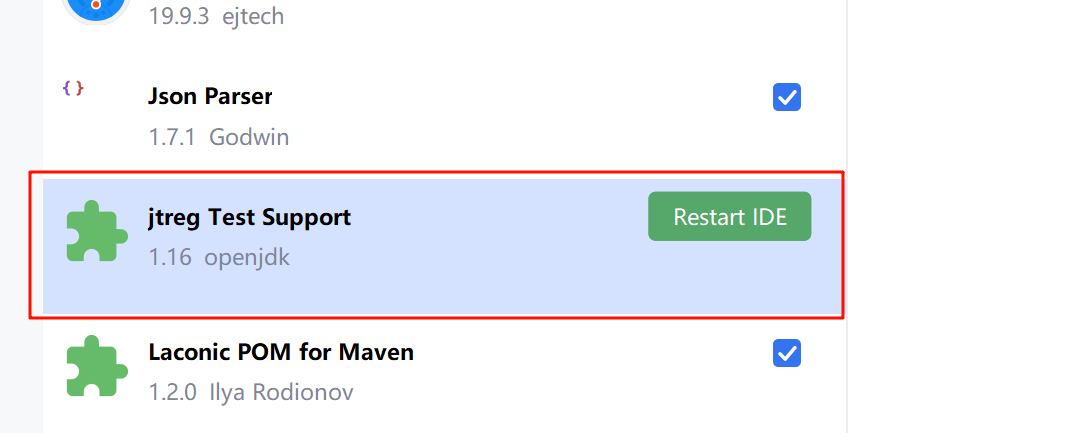
安装成功,重启下idea。
重启后,打开test包下的测试文件,发现可以识别测试案例了。随意运行一个测试案例,还是报错:

因为我是用windows的,没有make这个指令,我这边本来就已经构建好了,所以先把build.xml中和make构建相关的注释了,然后再运行,结果如下:
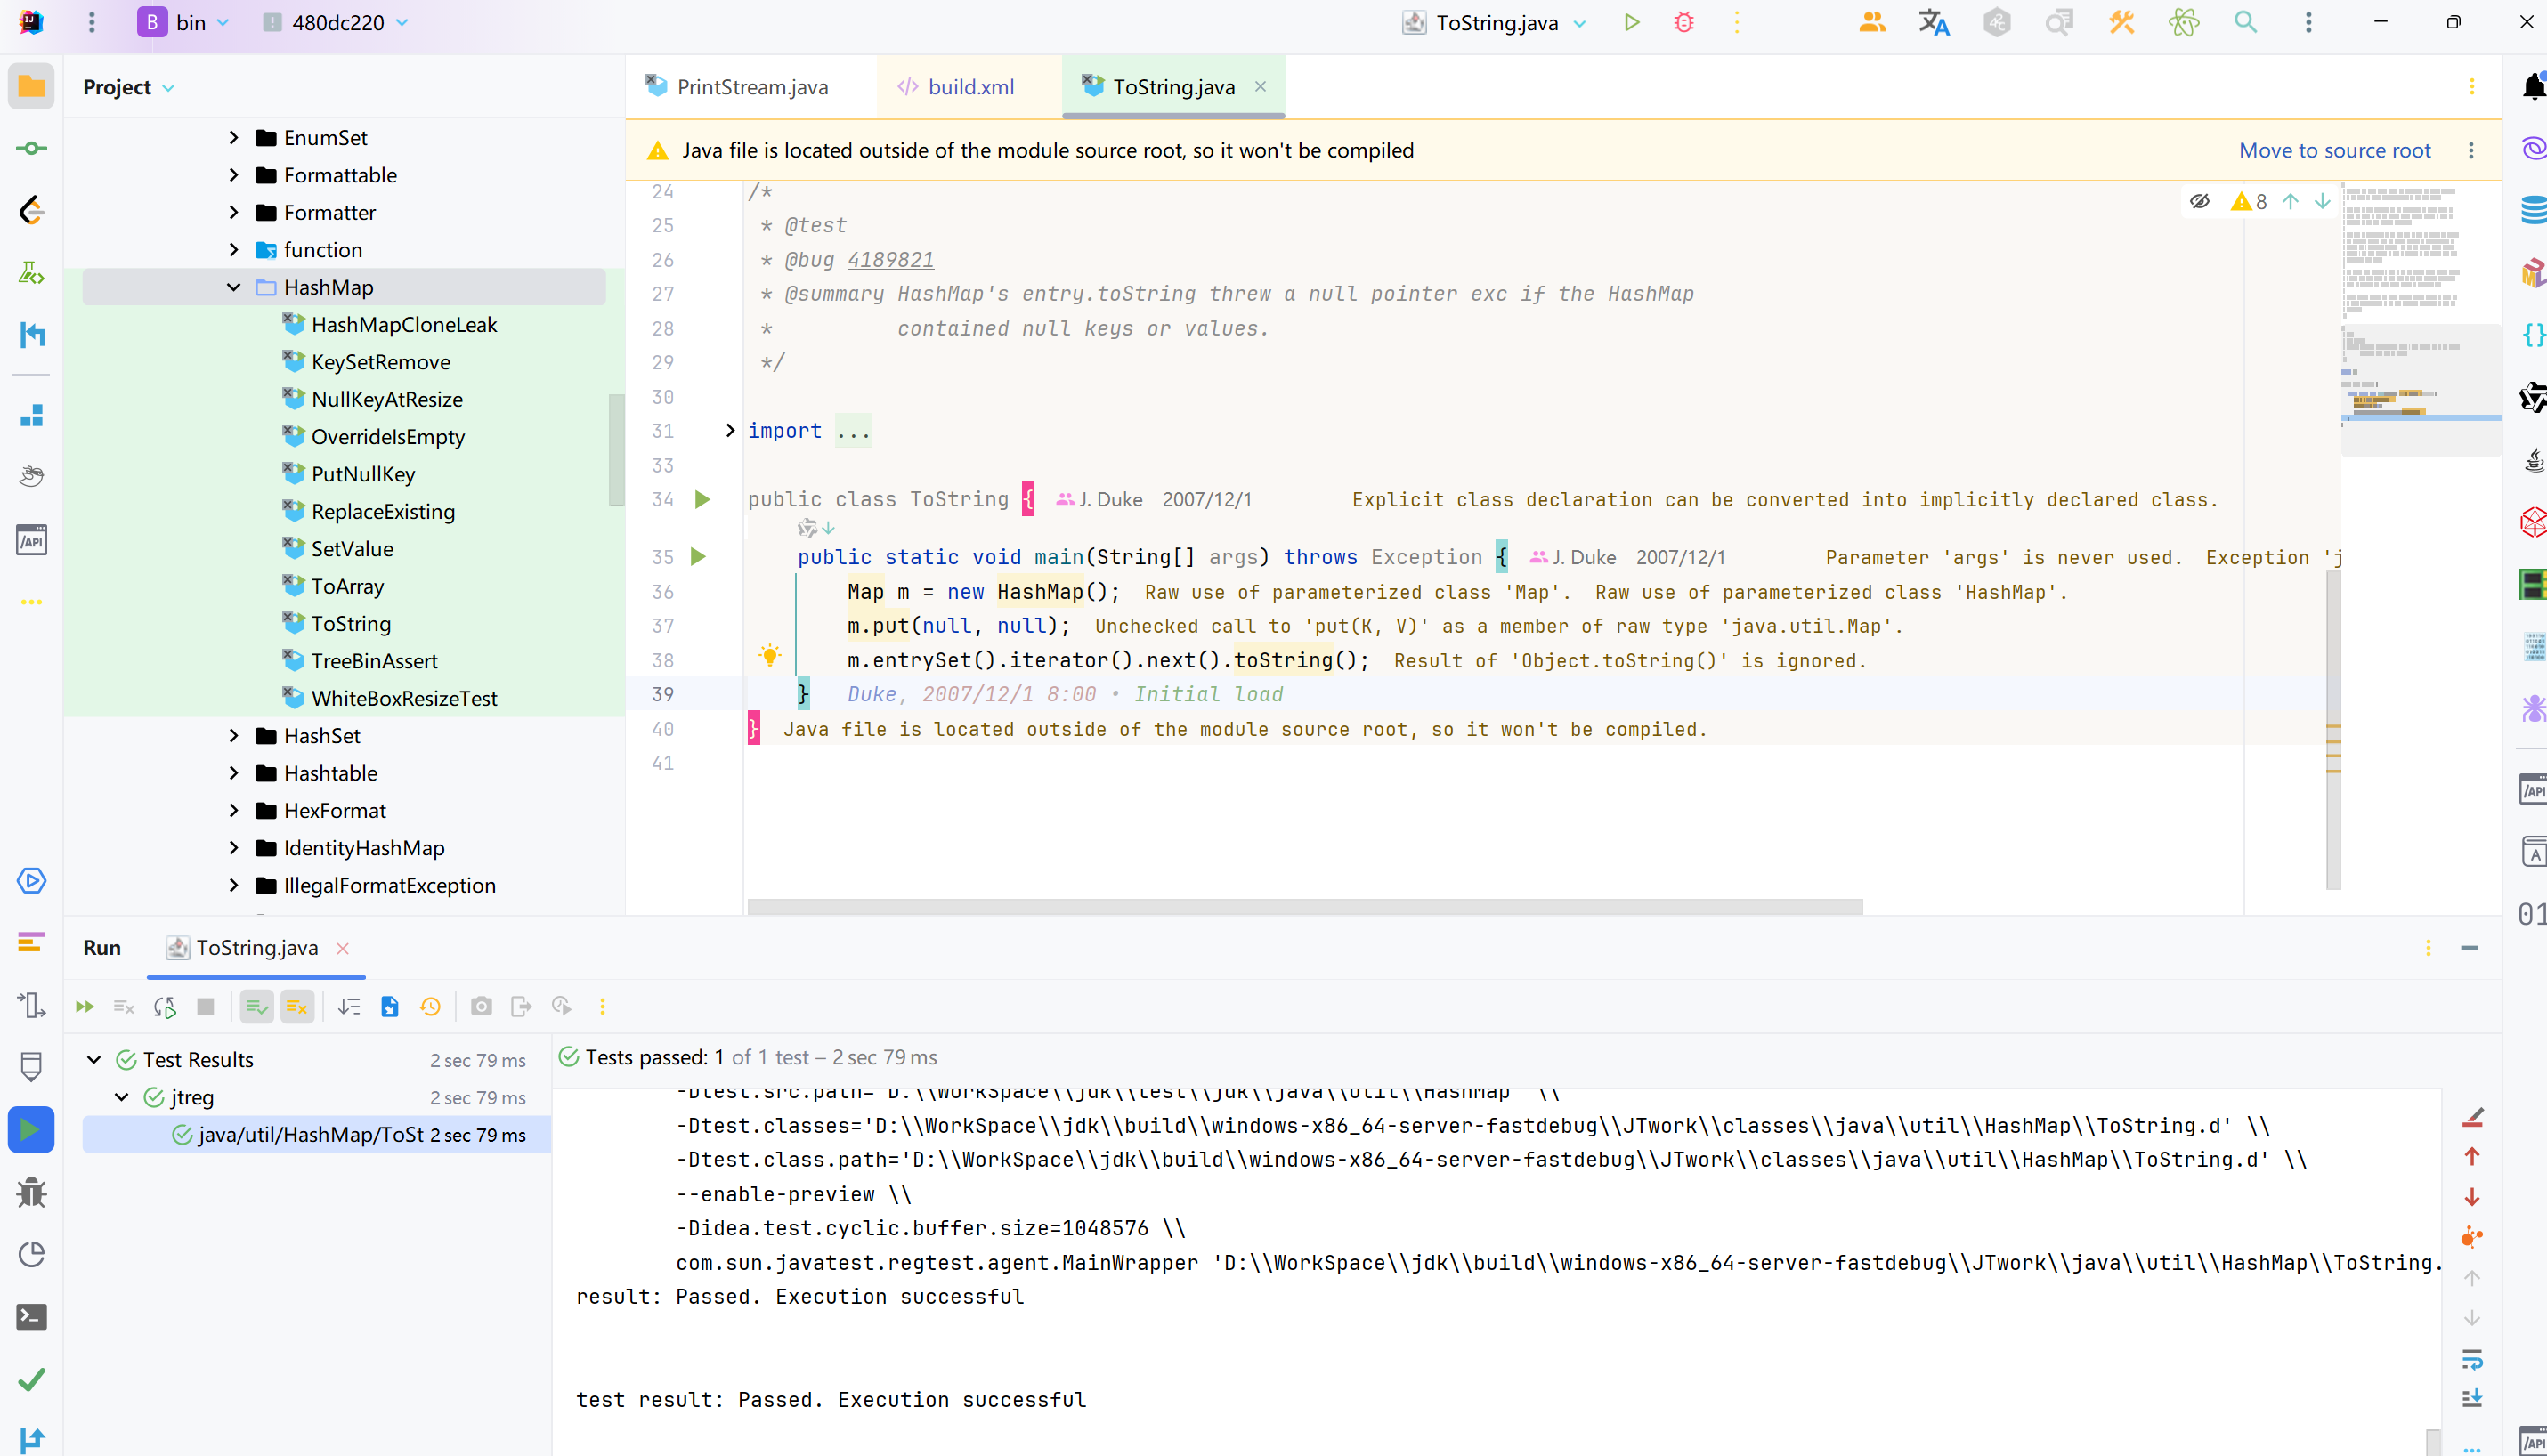
这样就可以debug对java的代码进行开发修改了。
博客内容遵循 署名-非商业性使用-相同方式共享 4.0 国际 (CC BY-NC-SA 4.0) 协议
本文永久链接是:https://blog.lgq51233.xyz/2021/09/06/%E8%B0%83%E8%AF%95OpenJDK/