
Elasticsearch基础
安装ElasticSearch
# 创建elsearch用户, Elasticsearch不支持root用户运行
useradd elsearch
# 解压安装包
tar -xvf elasticsearch-7.6.0-linux-x86_64.tar.gz -C /rent/es/
# 修改权限所有者 用户:用户组
chown elsearch:elsearch es -R
# 切换用户
su elsearch
# 修改配置文件
vim /config/elasticsearch.yml
# 绑定的地址
network.host: 192.168.123.121
discovery.type: single-node
# 说明:在Elasticsearch中,如果network.host不是localhost或者127.0.0.1的话, 就会认为是生产环境, 会对环境的要求比较高, 测试环境不一定能够满足, 一般情况下需要修改2处配置, 如下:
#1:修改jvm启动参数
vim config/jvm.options
-Xms128m # 根据机器情况修改
-Xmx128m

# 启动elasticsearch
cd bin
./elasticsearch
# 后台启动
./elasticsearch -d

# 启动报 [1]: max file descriptors [4096] for elasticsearch process is too low, increase to at least [65535]
# 编辑 /etc/security/limits.conf
vim /etc/security/limits.conf
elsearch soft nofile 65536
elsearch hard nofile 65536

# 启动报 [1]: max virtual memory areas vm.max_map_count [65530] is too low, increase to at least [262144]
# 单个进程中的最大线程数
vim /etc/sysctl.conf
vm.max_map_count=655360
sysctl -p

# 启动报 [1]: the default discovery settings are unsuitable for production use; at least one of [discovery.seed_hosts, discovery.seed_providers, cluster.initial_master_nodes] must be configured
vim /config/elasticsearch.yml
# 取消注释
cluster.initial_master_nodes: ["node-1"]
访问 192.168.123.121:9200, 返回以下信息说明启动成功
{
    "name": "localhost.localdomain",
    "cluster_name": "elasticsearch",
    "cluster_uuid": "_na_",
    "version": {
        "number": "7.6.0",
        "build_flavor": "default",
        "build_type": "tar",
        "build_hash": "7f634e9f44834fbc12724506cc1da681b0c3b1e3",
        "build_date": "2020-02-06T00:09:00.449973Z",
        "build_snapshot": false,
        "lucene_version": "8.4.0",
        "minimum_wire_compatibility_version": "6.8.0",
        "minimum_index_compatibility_version": "6.0.0-beta1"
    },
    "tagline": "You Know, for Search"
}
# 停止服务 查看pid
jps
kill -9 88827
Docker安装ElasticSearch
# 拉取镜像
docker pull docker.elastic.co/elasticsearch/elasticsearch:7.6.0
# 创建容器
docker create --name elasticsearch --net host -e "discovery.type=single-node" -e "network.host=192.168.123.121" docker.elastic.co/elasticsearch/elasticsearch:7.6.0
# 启动
docker start elasticsearch
# 跟随日志
docker logs -f elasticsearch
Elasticsearch配置文件
# 集群名称
cluster.name: ES-Cluster
# 节点名称
node.name: ES-node1
# 是否是master节点
node.master: true
# 是否允许该节点存储索引数据
node.data: true
# 日志目录
path.logs: /var/log/elasticsearch
# 绑定地址
network.host: 0.0.0.0
# http端口
http.port: 9200
# 集群主机列表
discovery.seed_hosts: ["192.168.123.121", "192.168.123.122"]
# 启动全新的集群时需要此参数,再次重新启动时此参数可免
#cluster.initial_master_nodes: [“10.45.154.236”]
# 集群内同时启动的数据任务个数,默认是2个
cluster.routing.allocation.cluster_concurrent_rebalance: 32
# 添加或删除节点及负载均衡时并发恢复的线程个数,默认4个
cluster.routing.allocation.node_concurrent_recoveries: 32
# 初始化数据恢复时,并发恢复线程的个数,默认4个
cluster.routing.allocation.node_initial_primaries_recoveries: 32
# 存储位置
path.data: /data
# 是否开启跨域访问
http.cors.enabled: true
# 开启跨域访问后的地址限制,*表示无限制
http.cors.allow-origin: "*"
Elasticsearch-head安装
不推荐,通过Docker安装。
# 拉取镜像
docker pull mobz/elasticsearch-head:5
# 创建容器
docker create --name elasticsearch-head -p 9100:9100 mobz/elasticsearch-head:5
# 启动容器
docker start elasticsearch-head
# 开启elasticsearch跨域
vim elasticsearch.yml
http.cors.enabled: true
http.cors.allow-origin: "*"
不推荐,通过源码编译安装。
git clone git://github.com/mobz/elasticsearch-head.git
cd elasticsearch-head
npm install
npm run start
open http://localhost:9100/
Elasticsearch 7.xx 默认不再支持指定索引类型
{
    "settings": {
        "index": {
            "number_of_shards": "2",
            "number_of_replicas": "0"
        }
    },
    "mappings": {
        "person": {
            "properties": {
                "name": {
                    "type": "text"
                },
                "age": {
                    "type": "integer"
                },
                "mail": {
                    "type": "keyword"
                },
                "hobby": {
                    "type": "text"
                }
            }
        }
    }
}
返回以下结果:
{
    "error": {
        "root_cause": [
            {
                "type": "mapper_parsing_exception",
                "reason": "Root mapping definition has unsupported parameters:  [person : {properties={mail={type=keyword}, name={type=text}, age={type=integer}, hobby={type=text}}}]"
            }
        ],
        "type": "mapper_parsing_exception",
        "reason": "Failed to parse mapping [_doc]: Root mapping definition has unsupported parameters:  [person : {properties={mail={type=keyword}, name={type=text}, age={type=integer}, hobby={type=text}}}]",
        "caused_by": {
            "type": "mapper_parsing_exception",
            "reason": "Root mapping definition has unsupported parameters:  [person : {properties={mail={type=keyword}, name={type=text}, age={type=integer}, hobby={type=text}}}]"
        }
    },
    "status": 400
}
修改后:
{
    "settings": {
        "index": {
            "number_of_shards": "2",
            "number_of_replicas": "0"
        }
    },
    "mappings": {
        "properties": {
            "name": {
                "type": "text"
            },
            "age": {
                "type": "integer"
            },
            "mail": {
                "type": "keyword"
            },
            "hobby": {
                "type": "text"
            }
        }
    }
}
Elasticsearch-Analysis-ik分词插件安装
# 安装方法:将下载到的elasticsearch-analysis-ik-6.5.4.zip解压到/elasticsearch/plugins/ik目录下即可.

# 如果使用docker运行
docker cp /root/elasticsearch-analysis-ik-7.6.0.zip elasticsearch:/usr/share/elasticsearch/plugins/
# 进入容器
docker exec -it elasticsearch /bin/bash
mkdir /usr/share/elasticsearch/plugins/ik
mv elasticsearch-analysis-ik-7.6.0.zip ik/
cd /usr/share/elasticsearch/plugins/ik
unzip elasticsearch-analysis-ik-7.6.0.zip
rm -rf elasticsearch-analysis-ik-7.6.0.zip
# 重启容器
docker restart elasticsearch
Elasticsearch-Analysis-ik自定义词典
# 进入容器
docker exec -it elasticsearch /bin/bash
cd plugins/ik/config
# 定义自己的词典
vi my.dic
# 把自定义的词典加进去
vi IKAnalyzer.cfg.xml
# 重启容器
docker restart elasticsearch
<?xml version="1.0" encoding="UTF-8"?>
<!DOCTYPE properties SYSTEM "http://java.sun.com/dtd/properties.dtd">
<properties>
    <comment>IK Analyzer 扩展配置</comment>
    <!--用户可以在这里配置自己的扩展字典 -->
    <entry key="ext_dict">custom/mydict.dic;custom/single_word_low_freq.dic</entry>
     <!--用户可以在这里配置自己的扩展停止词字典-->
    <entry key="ext_stopwords">custom/ext_stopword.dic</entry>
     <!--用户可以在这里配置远程扩展字典 -->
    <entry key="remote_ext_dict">location</entry>
     <!--用户可以在这里配置远程扩展停止词字典-->
    <entry key="remote_ext_stopwords">http://xxx.com/xxx.dic</entry>
</properties>
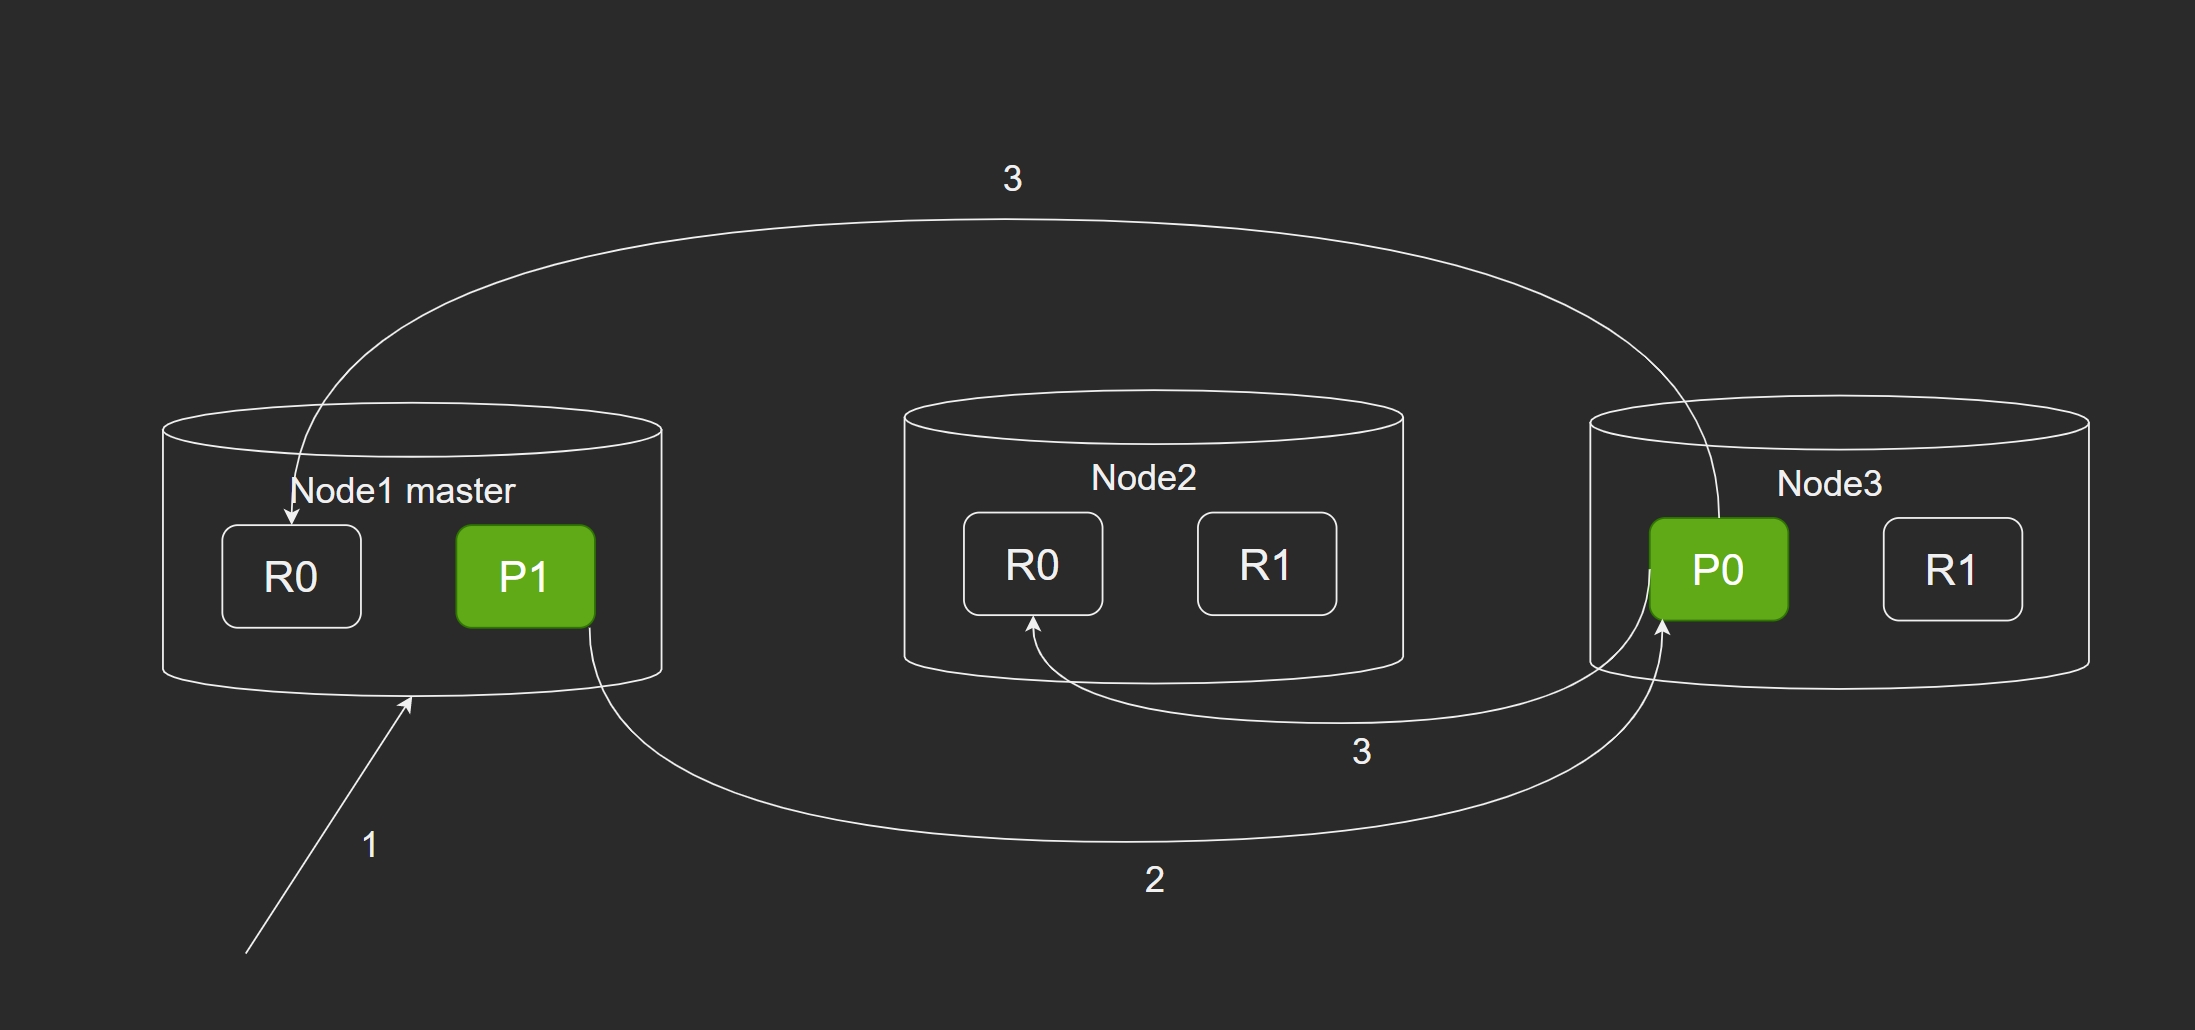
Docker搭建Elasticsearch集群
三个节点。
# 创建数据目录
mkdir /rent/es-cluster
cd /rent/es-cluster
mkdir node01
mkdir node02
# 创建目录ik的目录
mkdir /rent/es-cluster/ik
# 解压插件到此目录
unzip elasticsearch-analysis-ik-7.6.0.zip
# 复制安装目录下的elasticsearch.yml、jvm.options文件,做如下修改
# node01的配置:
cluster.name: es-rent-cluster
node.name: node01
node.master: true
node.data: true
network.host: 192.168.123.121
http.port: 9200
discovery.seed_hosts: ["192.168.123.121"]
cluster.initial_master_nodes: ["node01"]
http.cors.enabled: true
http.cors.allow-origin: "*"

# node02的配置:
cluster.name: es-rent-cluster
node.name: node02
node.master: false
node.data: true
network.host: 192.168.123.122
http.port: 9201
discovery.seed_hosts: ["192.168.123.121"]
cluster.initial_master_nodes: ["node01"]
http.cors.enabled: true
http.cors.allow-origin: "*"

# node03的配置:
cluster.name: es-rent-cluster
node.name: node03
node.master: false
node.data: true
network.host: 192.168.123.123
http.port: 9202
discovery.seed_hosts: ["192.168.123.121"]
cluster.initial_master_nodes: ["node01"]
http.cors.enabled: true
http.cors.allow-origin: "*"

# jvm.options
-Xms128m
-Xmx128m

# 创建容器,链接到插件到此目录之下
docker create --name es-node01 --net host -v /rent/es-cluster/node01/elasticsearch.yml:/usr/share/elasticsearch/config/elasticsearch.yml -v /rent/es-cluster/node01/jvm.options:/usr/share/elasticsearch/config/jvm.options -v /rent/es-cluster/node01/data:/usr/share/elasticsearch/data -v /rent/es-cluster/ik:/usr/share/elasticsearch/plugins/ik -v /rent/es-cluster/pinyin:/usr/share/elasticsearch/plugins/pinyin docker.elastic.co/elasticsearch/elasticsearch:7.6.0

docker create --name es-node02 --net host -v /rent/es-cluster/node02/elasticsearch.yml:/usr/share/elasticsearch/config/elasticsearch.yml -v /rent/es-cluster/node02/jvm.options:/usr/share/elasticsearch/config/jvm.options -v /rent/es-cluster/node02/data:/usr/share/elasticsearch/data -v /rent/es-cluster/ik:/usr/share/elasticsearch/plugins/ik -v /rent/es-cluster/pinyin:/usr/share/elasticsearch/plugins/pinyin docker.elastic.co/elasticsearch/elasticsearch:7.6.0

docker create --name es-node03 --net host -v /rent/es-cluster/node03/elasticsearch.yml:/usr/share/elasticsearch/config/elasticsearch.yml -v /rent/es-cluster/node03/jvm.options:/usr/share/elasticsearch/config/jvm.options -v /rent/es-cluster/node03/data:/usr/share/elasticsearch/data -v /rent/es-cluster/ik:/usr/share/elasticsearch/plugins/ik -v /rent/es-cluster/pinyin:/usr/share/elasticsearch/plugins/pinyin docker.elastic.co/elasticsearch/elasticsearch:7.6.0

# 启动容器
docker start es-node01 && docker logs -f es-node01
docker start es-node02 && docker logs -f es-node02
docker start es-node03 && docker logs -f es-node03
# 测试
POST http://192.168.123.121:9200/_analyze
{
  "analyzer": "ik_max_word",
  "text": "我是中国人"
}

博客内容遵循 署名-非商业性使用-相同方式共享 4.0 国际 (CC BY-NC-SA 4.0) 协议
本文永久链接是:https://blog.lgq51233.xyz/2020/03/02/Elasticsearch%E5%9F%BA%E7%A1%80/